


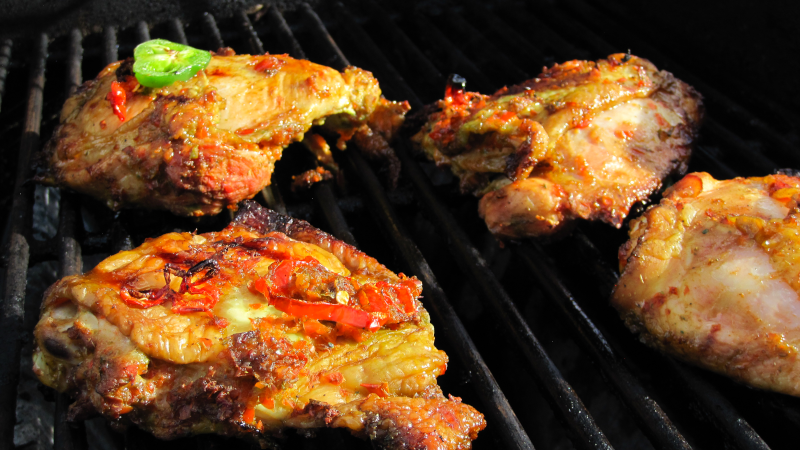
Pellet Smoked Habanero Chicken Thighs
Welcome to a culinary adventure that combines smoky goodness, fiery heat, and a touch of sweetness! In this mouthwatering recipe, we will explore the irresistible combination of juicy chicken thighs infused with the intense flavors of pellet smoke, habanero peppers, and the natural sweetness of honey. Prepare to embark on a flavor-packed journey that will leave you craving for more.
Chicken thighs, known for their tenderness and juiciness, are the perfect canvas for our flavor infusion. But we won’t settle for ordinary. By harnessing the power of pellet smoking, we’ll take our chicken thighs to the next level, infusing them with a rich, smoky essence that will have you salivating from the moment you catch a whiff.
Now, let’s turn up the heat! The habanero pepper, notorious for its fiery kick, will bring a bold and vibrant flavor to our dish. Its distinct fruity notes will dance on your palate, adding a tantalizing heat that will awaken your taste buds and leave you craving for more.
But we’re not done yet. We’ll balance the spiciness with the natural sweetness of honey, creating a harmonious blend of flavors that will truly take this dish to new heights. The honey will provide a subtle caramelization and glaze, complementing the smoky and spicy elements with its gentle touch.
So, if you’re ready to embark on a flavor adventure that combines smoky, spicy, and sweet, join us as we explore the magic of pellet smoked habanero honey chicken thighs. Get your taste buds ready for a symphony of flavors that will have you coming back for seconds, and maybe even thirds. Let’s dive in and discover the irresistible allure of this incredible dish!
Man That’s Cooking
Ingredients
- 4 bone in skin on chicken thighs
- 1 red bell pepper
- 1 jalapeno pepper
- 2 habanero pepper
- 1/2 cup green habanero sauce
- 1/2 tbsp kosher salt
- 1/4 tsp black pepper
- 1/2 tsp paprika
- 1 tbsp honey
- 2 tsp brown sugar
Directions
First, slice a habanero pepper and half of a jalapeno pepper into thin slices while keeping the seeds in. Set the slices aside in a container for later. Next, use a mini chopper or a blender to chop the bell pepper, one habanero, and half of the jalapeno. You can keep the seeds of the habanero and jalapeno on for extra heat but this recipe recommends you remove them. If you are using a blender, just pulse the contents a few times to create a liquid mash with large chunks.
Next place the chicken thighs in a container and pour the pepper mash from the chopper / blender over the chicken thighs. Add the habanero sauce, black pepper, kosher salt, paprika, and brown sugar. Wear a glove and hand mix the chicken to evenly coat all sides with the pepper mash mixture. Cover the container and place it in the refrigerator overnight or at least 12 hours.
When you are ready to cook the chicken, preheat your smoker to 275F using hickory, pecan, or apple wood pellets. When the smoker reaches temperature, place the chicken skin side up on the smoker. Cover the skin with any remaining pepper mash and add 2 pepper slices on each thigh. Cook for 30 minutes, then add honey to the skins. Cook another 30 minutes or until the chicken reaches 165F. 175F is the target for thighs, but we will finish them over fire.
Preheat your grill when the chicken temps get close to 165F. If your pellet smoker has a grill mode, remove and cover the chicken at 165F. When the grill is ready, place the chicken on skin side down and place some pepper slices on the top side. Close the lid and cook for 5 – 8 minutes then flip. Cook another 5 – 8 minutes or until they reach 175F.
 Print This Recipe
Watch How To Make This Recipe
Pellet Smoked Chicken Breasts
Pellet Smoked Chicken Breasts
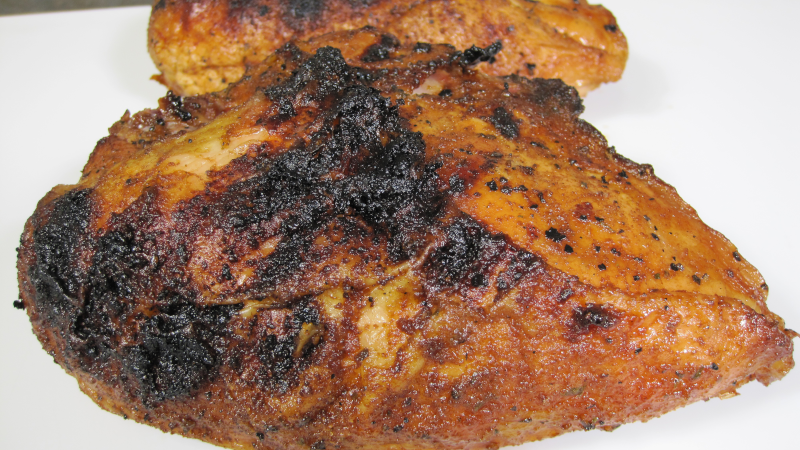
Chicken breasts on a pellet smoker are always a delicious meal. But you should avoid the boneless skinless breasts because they are lean meat and that usually dries out on the smoker. Go for the bone in skin on chicken breasts which usually cost less than the boneless skinless type. The rib bones help protect the meat from the heat and the fat in the skin keeps the lean breast meat from drying out. If you have time to do an overnight brine, the meat will be even juicer and more flavorful. Smoking chicken under 300F usually results in a rubbery skin texture and to avoid that you can cook the final stages under high heat or over a flame. For this recipe, were going to smoke the chicken breasts at 235F for roughly 2 hours until they reach about 158F. Then they get transferred to to a grill and placed skin side down with the lid open. This will tighten up the skin and give it a nice flame kissed flavor.
Man That’s Cooking
Ingredients
- 2 – 4 chicken breasts bone in skin on
- 2 tbsp BBQ rub
Brine
- 1 gallon water
- 1/2 cup kosher salt
- 1 tsp smoked paprika
- 1 tbsp black peppercorns
- 1 sprig rosemary
- 1 lemon
Directions
Boil 1 gallon of water along with all of the listed brine ingredients. Allow the brine to boil for a few minutes then turn off the heat. Remove the pot from the burner and allow the liquid to cool for 1 hour. You can add ice in a large zip seal bag to speed up the cooling process but do not add ice directly to the brine because this will dilute the solution. When the liquid reaches a medium warm temperature, add it to an 8 quart container and place it in the refrigerator for several hours.
When the brine reaches refrigerator temperature (around 32F) then add the chicken breasts to the brine. Place the brine back in the refrigerator overnight or at least 12 hours.
After the brine phase, wash off the chicken breasts then place them on a sheet pan with a cooling rack. Pat the chicken down with paper towels to absorb as much liquid as possible. It is important to dry off the skin as much as possible to prevent rubbery skin texture. If you have time, place the chicken back in the refrigerator overnight and this will circulate air around them which dries off the skin.
When you are ready to cook, preheat your smoker to 235 using pecan wood pellets. Place the chicken breasts on an upper rack in your smoker and let them cook for around 2 hours or until they reach a internal temperature of 158F.
Transfer the chicken breasts to a preheated grill and place them skin side down. If you are using a gas grill, set the burner on medium. Keep the lid open and watch out for any flare ups as the chicken fat melts into the flame. Cook until the skin reaches your desired doneness, then flip and cook on the rib bone side. Cook until the internal temperature reaches 165F.
Print This Recipe
Watch How To Make This Recipe
https://youtu.be/K6-_Ogyl3k0
Pellet Smoked Chicken Legs
Pellet Smoked Chicken Legs
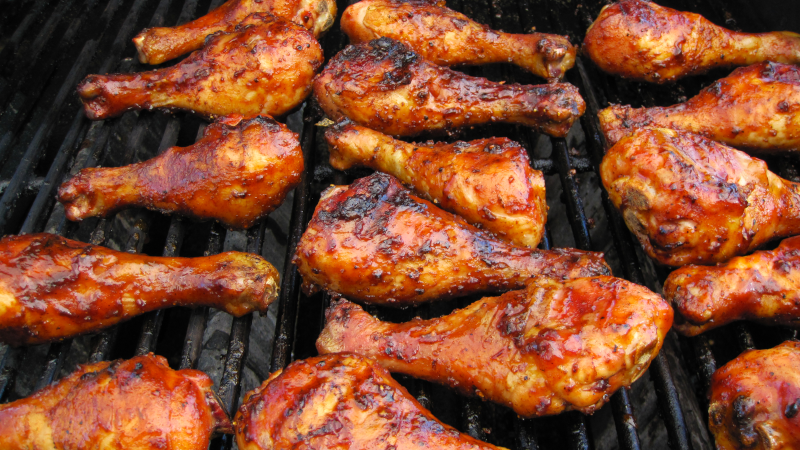
Summer barbecues must have chicken legs coated with delicious sauce. But have you ever tried smoked chicken legs? It only takes about 2 hours to get some smoke into the meat and then you can finish them off over the fire of your grill. This is a simple recipe with a short prep time and best of all chicken drums are low cost. This recipe uses several different commercial rubs that you can find online or you can make your own rub or seasoning. And for the BBQ sauce, this recipe uses combination of Stubbs and Sweet Baby Rays. And you can always skip on the sauce if you prefer dry rub style.
Man That’s Cooking
Ingredients
- 5.25 lb chicken legs
- 1 tsp yardbird rub
- 1 tsp holy voodoo rub
- 1 tsp trager chicken rub
- 1 cup BBQ sauce (1/2c Stubbs sticky sweet, 1/2c Sweet Baby Rays Original)
Directions
First, spray down all sides of the chicken legs with duck fat. This will help the rub stick to the skin and it will help turn the skin nice and dark. Next apply the dry rub on all sides.
Heat up your pellet smoker at 240F using pecan, hickory or mesquite pellets. When the smoker reaches temp, place the chicken legs on the top rack. Cook the legs for one hour then spay them with duck fat. Flip them over and spray the other side. Cook for another hour or until the legs hit around 163F.
This step will hot cook the skin to tighten it up. If you have a grill, preheat it to a medium temperature or around 425F. Add the chicken legs and let them cook for about 10 minutes. Apply BBQ sauce to all sides then continue to cook uncovered. Flip them occasionally and apply more sauce until they reach about 175F. Remove them from the grill and let them rest 5 minutes before eating.
Print This Recipe
Watch How To Make This Recipe
Smoked Beer Can Chicken
Smoked Beer Can Chicken
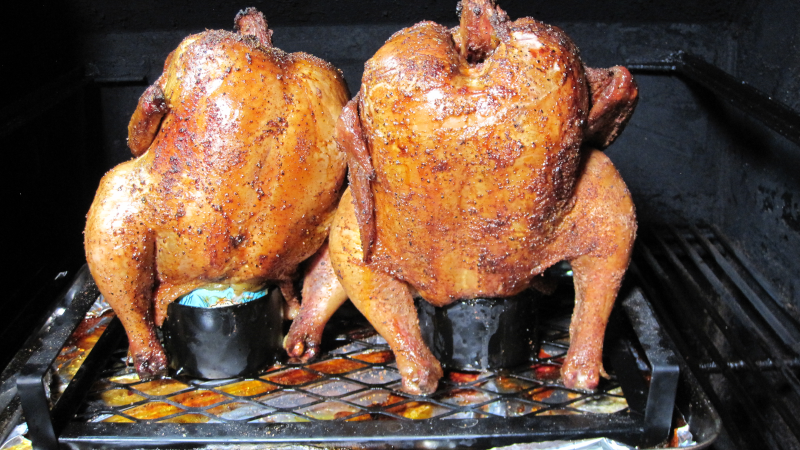
Beer can chicken a.k.a drunken chicken is a fun and easy cook on your smoker or grill. You just need to make sure you have enough clearance to close the lid over a chicken that is going to be standing up. If you want to avoid knocking over the chicken while it’s balanced on a beer can, purchase a cheap beer can holder rack. These come in various sizes so you can get a single or double holder. If you are going to smoke the chicken, you can do low and slow 235F – 250F for around 4 – 5 hours. The skin will be a bit rubbery but you can sear it on high heat at the end of the smoke. For this recipe we’ll run a little hotter at 300F for about 3 1/2 hours. This makes the skin more crispy but gives enough time for some smoke flavor. If you cook this on a grill, it should be done indirectly. For flavoring, this recipe adds herbs and garlic to the beer cans. But you can use citrus or chili peppers or whatever you like.
Man That’s Cooking
Ingredients
- 2 whole chickens
- 2 cans of beer
- 4 garlic cloves
- 6 sprigs thyme
- 6 sprigs rosemary
- 4 sprigs sage
Directions
First, let’s get the most difficult step out of the way. Drink 2 cans of beer. Next use a can opener to remove the tops of the cans. After the tops are removed, add beer until each can is 1/4 full. Next rough cut the garlic cloves into chunks and add them and the herbs to the cans.
Next, remove the chicken from any packaging and dry off the skin with paper towels. Spray the skin on all sides with duck fat and this will help give the chicken a nice golden color. Season all sides of the skin and the inside cavity with your favorite BBQ seasoning. If you don’t have any favorites, a simple salt, pepper, garlic and paprika combo will do.
Preheat your smoker with pecan or hickory wood at 300F. You can use a lower and slower temperature (235F -250F) to get more smoke but the skin will come out less crispy.
When the chicken is seasoned, place the beer cans into the holding rack and slide the chickens over the beer cans. If you do not have a holding rack you can use a foil pan as a base and try to carefully move everything into the smoker. If you are going to use a wireless (or wired) temperature probe, stick it in at the top of the breast near the neck and push it in downward (see video).
Spray the chicken every hour with duck fat to oil those birds up like they are getting a tan at Miami Beach!
When the top of the breast meat reaches 165F and the legs and thighs are 175F, remove the chickens from the smoker and let them sit for 5 minutes. Don’t tent the chickens with foil, it will keep the steam on the skin undoing your crisping efforts. Now you can carve the chickens or pull the meat off the bones for good pulled chicken.
Print This Recipe
Watch How To Make This Recipe
