Sous Vide Tri-tip
Experience the perfect fusion of precision cooking and smoky, fire-kissed flavor with our Sous Vide Tri-Tip. This recipe takes full advantage of the sous vide method, ensuring a perfectly tender and juicy tri-tip, which is then finished on a charcoal grill for that unbeatable, savory crust.
We start by seasoning the tri-tip simply but effectively, using just salt, pepper, and garlic to enhance the natural flavor of this flavorful cut of beef. The tri-tip is then sealed and submerged in the sous vide bath, where it slowly cooks at a precise temperature for six hours. This gentle cooking process breaks down the meat’s fibers, resulting in a tri-tip that’s incredibly tender and evenly cooked from edge to edge.
Once the sous vide process is complete, the tri-tip is quickly shocked in an ice water bath to halt the cooking and reduce the temperature. This step ensures that the tri-tip can be stored in the refrigerator until you’re ready to finish it on the grill, making it an ideal make-ahead option for any gathering.
When it’s time to serve, the tri-tip is brought to life once more with a thick coating of BBQ rub, adding a final layer of flavor and spice. It’s then seared over a hot charcoal grill, where the intense heat creates a beautiful crust on the outside, locking in the juices and enhancing the smoky, char-grilled essence. The combination of the sous vide’s precision and the grill’s raw power results in a tri-tip that’s both succulent and bursting with flavor.
Whether you’re hosting a barbecue or simply enjoying a weekend cookout, this Sous Vide Tri-Tip offers the best of both worlds—a dish that’s as tender and juicy as it is smoky and flavorful. Get ready to wow your guests with a steakhouse-quality tri-tip that’s perfectly cooked every time.
Man That’s Cooking
Ingredients
- 2.5 – 3.5lb tri-tip
- 1 tsp kosher salt
- 1 tsp black pepper
- 1 tsp garlic powder
Directions
Pat the tri-tip dry with paper towels. Generously season all sides of the tri-tip with kosher salt, freshly ground black pepper, and garlic powder. Rub the seasoning into the meat to ensure even coverage.
Fill a large pot or container with water and attach your sous vide immersion circulator. Set the temperature to 131°F (55°C) for medium-rare, or adjust according to your preferred level of doneness.
Place the seasoned tri-tip in a vacuum-sealable bag or a resealable freezer bag using the water displacement method. If using a vacuum sealer, seal the bag, ensuring there are no air pockets. If using a resealable bag, lower the bag into the water bath slowly until all air is out, then seal. Submerge the sealed tri-tip in the water bath, making sure it’s fully covered by water. Cook the tri-tip for 6 hours.
About 10 minutes before the sous vide process is complete, prepare an ice water bath in a large bowl or container. The bath should be cold enough to quickly chill the tri-tip and stop the cooking process.
After 6 hours, remove the tri-tip from the water bath. Immediately submerge the sealed tri-tip in the ice water bath to cool it down and stop the cooking process. Allow it to chill for 20 minutes and add more ice if needed.
Once cooled, remove the tri-tip from the ice water bath. You can either proceed to the searing step or refrigerate the tri-tip for up to 7 days until you’re ready to finish it on the grill.
When ready to sear, set up your charcoal grill for high, direct heat. Allow the grill to get very hot, with the coals glowing red and covered with white ash. You want the grill grates to be hot enough to create a good sear.
While the grill is heating, remove the tri-tip from the bag and pat it dry with paper towels. Generously coat all sides of the tri-tip with your preferred BBQ rub, pressing it into the meat to create a thick, flavorful crust.
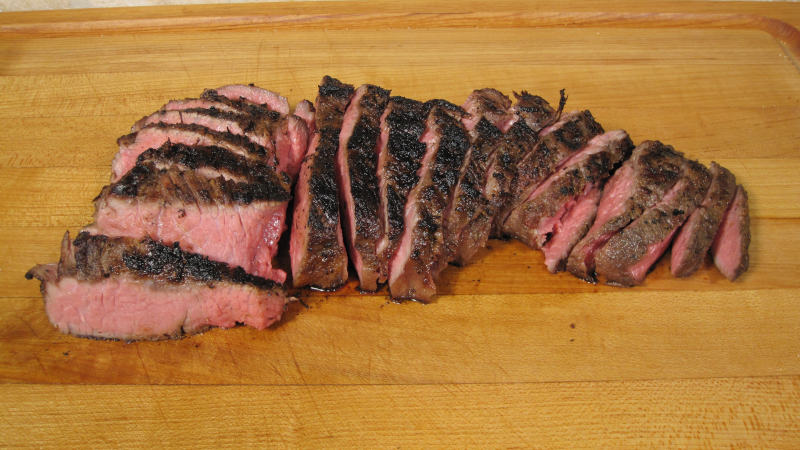
Place the tri-tip directly over the hot coals. Sear each side for about 2 – 4 minutes, or until a deep, caramelized crust forms. Use tongs to turn the tri-tip, ensuring all sides are evenly seared.
Once the tri-tip is seared to your liking, remove it from the grill and let it rest for 5-10 minutes to allow the juices to redistribute. Slice the tri-tip against the grain into thin slices.
 Print This Recipe
Watch How To Make This Recipe