


Dutch Oven Boneless Turkey Roast
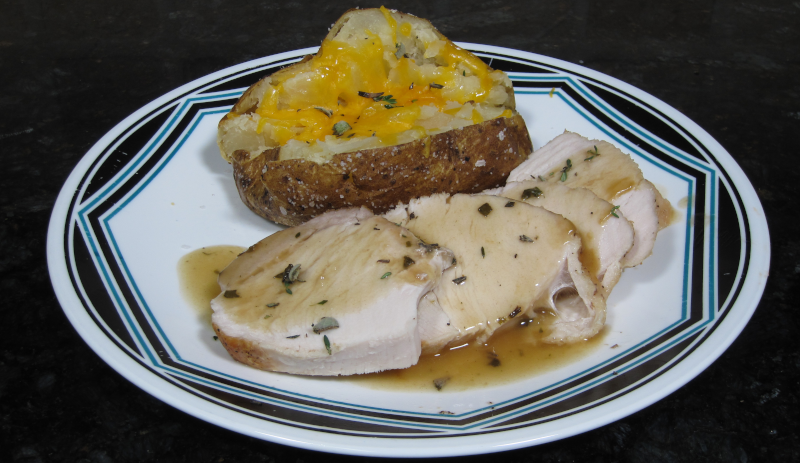
In the world of hearty, home-cooked meals, few dishes rival the comforting embrace of a perfectly roasted turkey. Today, we’re unveiling a culinary gem – our Dutch Oven Boneless Turkey Roast. It’s a dish that combines simplicity and sophistication to deliver a mouthwatering experience that’s sure to become a cherished part of your family’s table.
At the heart of this recipe is a magnificent 3-pound boneless turkey roast, a canvas ready to absorb the flavors of our aromatic herbs and seasonings. We’ll infuse it with the earthy essence of fresh thyme, the robust aroma of rosemary, and the savory richness of sage. These herbs will not only add depth but create an irresistible fragrance that will fill your kitchen as it cooks to perfection.
To ensure every bite is seasoned to perfection, we’ll generously salt and pepper all sides of the roast. Then, we’ll take our culinary adventure to the stovetop, where a preheated Dutch oven awaits. Searing the turkey roast on all sides in a hot Dutch oven will lock in the juices and set the stage for a beautifully browned exterior.
But the magic doesn’t stop there. After this initial sear, we’ll generously coat our turkey roast with a medley of minced thyme, rosemary, and sage, infusing it with even more flavor. Then, into the preheated oven it goes, where it will gently roast to a succulent 170°F, ensuring a juicy and perfectly cooked centerpiece.
As the aroma fills your kitchen, the anticipation will grow. And when it’s finally time to slice and serve, you’ll discover that the Dutch Oven Boneless Turkey Roast is not just a meal; it’s an experience, a journey of flavor that brings warmth and comfort to your table.
Man That’s Cooking
Ingredients
- 3 pounds boneless turkey roast
- 3 sprigs fresh thyme
- 1 sprig fresh rosemary
- 1 sprig fresh sage
- 1 teaspoon kosher salt
- 1 teaspoon black pepper
- 1 teaspoon vegetable oil
Directions
Preheat the oven to 350 F. Preheat the dutch oven on a burner on medium heat. Remove the turkey roast from the outside packaging but leave the string net on the roast. Wipe down the roast with a paper towel, then rub it down with vegetable oil. Salt and pepper all sides.
When the dutch oven is heated, sear the turkey roast on all sides for about 2 – 3 minutes per side. After searing, coat all sides of the roast with oil, then minced thyme, rosemary and sage. Place the dutch oven without the lid in the preheated oven and cook for 60 – 90 minutes or until the roast reaches 170 F.
Remove the turkey roast and transfer it to a cutting board. Allow the roast to rest for 10 minutes uncovered. While the turkey is resting, prepare the gravy by transferring the juices from the dutch oven into a measuring cup.
Add water until you have 1 3/4 cups of liquid. Pour this liquid back into the Dutch oven along with the gravy packet and bring everything to a boil. When the gravy reaches a boiling point, reduce the heat to a medium low and stir with a wooden spoon or silicone spatula removing the fond from the bottom of the Dutch oven. Cook for about 5 minutes or until the gravy is thickened.
 Print This Recipe
Watch How To Make This Recipe
Horseradish Cream Sauce
Horseradish Cream Sauce
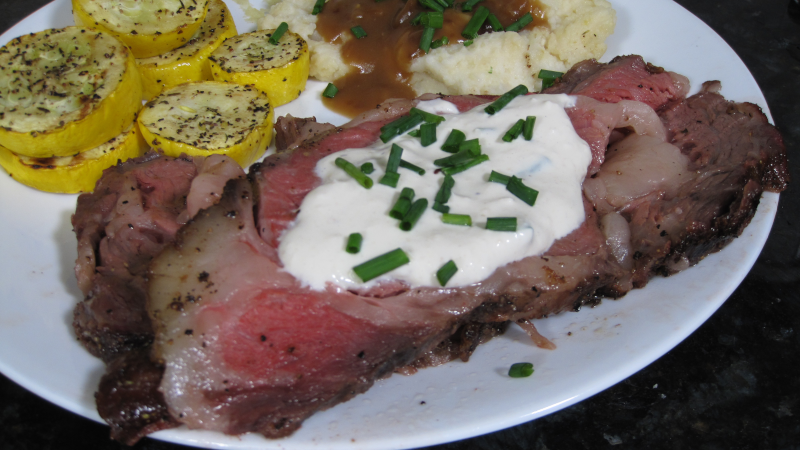
This sauce is a true game-changer, adding a burst of zesty, creamy goodness to your favorite dishes. Whether you’re serving up a perfectly grilled steak, a tender piece of roast beef, or even a juicy burger, this sauce is the secret ingredient that will take your meal from ordinary to extraordinary.
In this culinary adventure, we’ll combine the rich and velvety texture of heavy whipping cream with the delightful tang of sour cream. But that’s just the beginning! Our secret weapon in this sauce is the fiery kick of horseradish, balanced by the bright and zesty notes of freshly squeezed lemon juice. To add depth and complexity, we’ll incorporate the subtle heat of Dijon mustard and the umami richness of Worcestershire sauce.
Of course, every great sauce needs a touch of seasoning, and we won’t disappoint. A pinch of salt and a dash of pepper will enhance all the flavors, creating a perfectly balanced symphony for your taste buds. And for that final flourish, we’ll sprinkle in some minced chives, adding a fresh, herbaceous note that ties everything together.
Man That’s Cooking
Ingredients
- ½ cup heavy whipping cream
- ½ cup sour cream
- ¼ cup prepared horseradish
- 1 tablespoon lemon juice
- 1 tablespoon dijon mustard
- 1 teaspoon Worcestershire sauce
- 1 tablespoon minced chives
- ½ teaspoon salt
- ¼ teaspoon black pepper
Directions
In a medium bowl whisk heavy cream until it thickens up, roughly 2 minutes. Fold in the sour cream and whisk for another minute until it is fully combined with the cream. Mix in the remaining ingredients.
Transfer the cream to a small air tight storage container and refrigerated it for at least 1 hour before using. It should last up to 2 weeks in the refrigerator.
Print This Recipe
Watch How To Make This Recipe
Oven Roasted Boneless Rib Roast
Oven Roasted Boneless Rib Roast
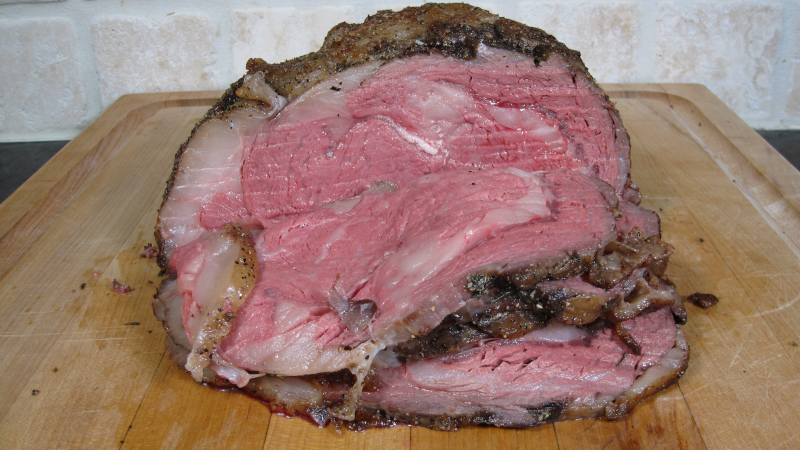
In this recipe, we’re diving into the world of succulent, melt-in-your-mouth Oven Roasted Boneless Rib Roast. This classic dish is the epitome of indulgence and is sure to be the centerpiece of your next feast.
Our star of the show is a magnificent 7-pound boneless rib eye roast, promising tender perfection in every slice. To elevate its natural richness, we’ll generously season it with the timeless trio of salt, pepper, and a hint of aromatic garlic powder. Then, we’ll invite the vibrant freshness of thyme to dance on this beautiful canvas of flavors.
But before the magic truly begins, we’ll start by giving this magnificent roast a warm, rustic embrace. In a trusty cast iron skillet, we’ll carefully brown the roast on all sides, locking in those precious juices and setting the stage for a mouthwatering masterpiece.
Now, here comes the pièce de résistance: the gentle roasting in the oven. Set at a low and slow 200°F (93°C), the oven will work its magic, slowly coaxing the flavors to meld and the meat to become incredibly tender. This method ensures an even and controlled cook, ensuring that every bite is a symphony of succulence.
After the oven has worked its magic, our roast will need a well-deserved rest. A half-hour of resting time, during which the roast will relax and redistribute its juices, will result in a texture that’s incredibly juicy and incredibly delicious.
So, whether you’re celebrating a special occasion or simply seeking to elevate your everyday dinner, our Oven Roasted Boneless Rib Roast is the answer. With its tender texture, flavorful seasoning, and that inviting aroma that fills your home, this roast will make a lasting impression on your taste buds and in the hearts of your loved ones.
Man That’s Cooking
Ingredients
- 7 pound boneless rib eye roast
- 2 tsp kosher salt
- 2 tsp black pepper
- 2 tsp garlic powder
- 2 tsp fresh thyme
Directions
First, carefully and lightly shave off any hard fat from the fat cap and remove any surface silver skin. This is an optional step as most roasts will be cleaned up by the butcher. But if you do trim, leave at least 1/4 inch of fat cap on the top of the roast. Next, carefully slice a cross hatch pattern in the fat cap by only slicing the fat and not the meat.
Next generously apply kosher salt on all sides of the roast. Place the roast on a cooling rack on a cookie sheet to allow for airflow underneath the roast. Place this in the refrigerator for at least 24 hours and up to 4 days. This will dry brine the roast adding flavor to the meat while also tenderizing it.
After 24 hours of dry brine, remove the rib roast from the refrigerator and truss the roast using butcher twine. This helps keep the meat in an even shape while cooking so that it will cook evenly. If your roast is mostly a uniform shape, you can make this an optional step.
Pre-heat a 12 inch cast iron skillet on medium heat until it reaches between 500 and 550 F. Using silicone or cotton with nitrile gloves, hold the roast into the skillet and brown each side for 2 – 4 minutes. Be aware of any smoke detectors nearby that may alert from the smoke of this step.
After searing the roast, apply garlic powder, black pepper, and finely diced fresh rosemary to all sides of the roast.
Place the roast on the same cooling rack and cookie sheet used for the dry brine, then put it on the middle rack of a 200 F preheated oven.
Roast in the oven until the temperature probe alerts on 125 F, or roughly 39 minutes per pound. Remove the roast from the oven and lightly tent it with aluminum foil. Allow the roast to rest for 30 minutes. During this time, carryover cooking will raise the temperature by around 10 degrees making the roast a perfect color on the inside. After resting, slice to serve and enjoy.
Print This Recipe
Watch How To Make This Recipe
Easy Salsa
Easy Salsa
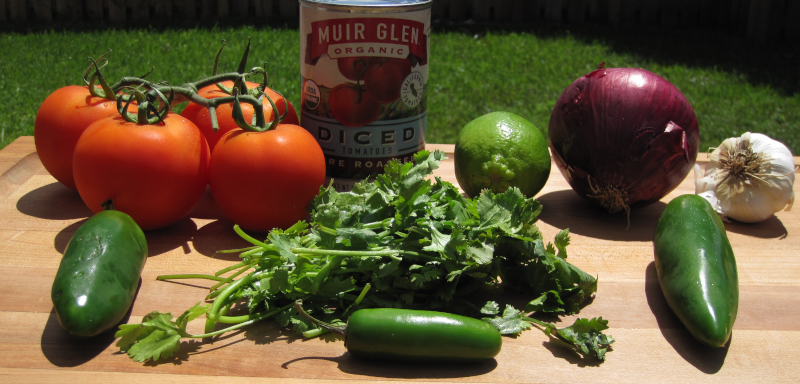
Dive into a world of vibrant flavors and zesty sensations with this quick and easy home made salsa recipe!
Prepare to awaken your taste buds with a symphony of fresh, garden-inspired ingredients. We’re talking about the juicy goodness of vine-ripened tomatoes, the fiery kick of jalapeno and serrano peppers, the aromatic allure of garlic, and the refreshing tang of lime juice.
But wait, there’s more! We’ll infuse this salsa with an irresistible blend of fragrant cilantro, a touch of smokiness from chili powder, and the warm embrace of cumin. A pinch of salt and a grind of black pepper will bring all these elements together in perfect harmony.
To create this sensational salsa, we’ll start by rough chopping the flavorful vegetables by hand. There’s something incredibly satisfying about the process – the sound of the knife meeting the cutting board, the rich aromas filling the air, and the anticipation of the final product.
Once our ingredients are prepped and brimming with potential, we’ll take them on a whirlwind journey in our trusty food processor. The result? A symphony of colors and textures, all beautifully blended into a luscious salsa that’s ready to steal the spotlight.
Whether you’re hosting a casual get-together, planning a fiesta, or simply looking to add a burst of flavor to your everyday dishes, this easy salsa is your ultimate companion.
Man That’s Cooking
Ingredients
- 1 can fire roasted tomatoes
- 4 vine ripened tomatoes
- 2 jalapeno peppers
- 1 serrano pepper
- 4 cloves of garlic
- 1/2 lime juiced
- 1/4 red onion
- 1/4 cup cilantro leaves
- 1/2 tsp kosher salt
- 1/2 tsp chili powder
- 1/4 tsp cumin
- 1/4 tsp black pepper
Directions
First open the can of fire roasted tomatoes and drain the liquid out by emptying the can into a colander. Let it drip dry for a few minutes then add the fire roasted tomatoes to a food processor. If you don’t have a food processor, you can use a blender but be careful not to blend on high speed or too much.
Next, slice the vine ripened tomatoes into quarters, then use a paring knife to remove the seeds. This is optional and we do this to reduce the liquid in the salsa. Cut the tomato quarters into smaller bits and add this to the food processor.
Next smash the garlic cloves to remove the skins, then chop the cloves. Add the garlic to the food processor.
Next cut the jalapeno and serrano peppers in half lengthwise, then remove the seeds. Cut the pepper halves into smaller chunks and add them to the food processor.
Next, cut 1/4 of a red onion into chunks and add this to the food processor.
Next cut the stems from 1/4 cup of cilantro, then roughly chop the leaves. Add the cilantro to the food processor.
Finally, add the juice of 1/2 of a lime and all the seasonings to the food processor. Pulse the food processor several times until the large chunks are pulled down into the blade. After this, run the food processor for 1 – 2 minutes. Pour the salsa into a container and place it in a refridgerator overnight or 24 hours to let the flavors combine.
Print This Recipe
Watch How To Make This Recipe
