Slow Cooker Mock Tender Roast
Mock tender roast may be an overlooked cut, but when treated right, it becomes a wallet-friendly, deeply satisfying centerpiece. This slow cooker version transforms the humble roast into a comforting dish layered with flavor. A quick sear adds depth, while a slow braise surrounded by classic pot roast vegetables brings everything together into a rustic, hearty meal.
The true star here is the low-and-slow method, coaxing tenderness out of a lean cut with every hour. Onions, garlic, carrots, celery, and Yukon gold potatoes soak up the seasoned broth, while a simple cornstarch slurry finishes the dish with a glossy gravy. You’ll get all the classic flavors of pot roast, with less fat than chuck and plenty of flexibility.
Real-world results show that this roast holds up well even when prepped the night before, and while the crockpot won’t get your gravy hot enough to thicken properly, a quick transfer to the stovetop solves the issue fast. Consider this a go-to for Sunday dinners or busy weeknights—one cook and you’ll be hooked.
Man That’s Cooking
Ingredients
- 2.5 pounds mock tender roast
- 2 tbsp olive oil
- 1 tsp salt
- 1/2 tsp black pepper
- 1 tsp garlic powder
- 1 tsp onion powder
- 1/2 tsp smoked paprika
- 1/2 tsp dried thyme
- 1 tbsp Worcestershire sauce
- 2 cups beef broth
- 1 tbsp tomato paste
- 1 large onion, sliced
- 3 cloves garlic, minced
- 4 large carrots, chopped
- 4 celery stalks, chopped
- 1 lb Yukon gold or baby gold potatoes
- 1 – 2 tbsp cornstarch
Directions
Pat the mock tender roast dry with paper towels. Trim off any silverskin or tough membrane if present. Season all sides with salt, pepper, garlic powder, onion powder, smoked paprika, and thyme.
Heat 2 tablespoons of olive oil in a skillet over medium-high heat. Once hot, sear the roast for 2–3 minutes per side until a rich brown crust forms. Transfer the seared roast to a tray or plate.
Optional: Overnight Prep with Food Safety Guidance
If you’re cooking the next day, let the seared roast cool for no more than 30 minutes at room temperature, uncovered or loosely tented with foil. Once no longer steaming, place the roast in the refrigerator on a shallow tray to cool completely. This helps it pass safely through the “danger zone” (40°F to 140°F) within USDA guidelines.
Allow the seared roast to cool in the refrigerator for at least 1 hour. Once cooled below 40°F, you can place it into the slow cooker insert with raw or sautéed vegetables and refrigerate the whole insert overnight. Make sure everything is fully chilled before storage. This saves time in the morning and remains safe if cooled properly.
In the same skillet, lower heat to medium and sauté sliced onions for about 3 minutes. Add the minced garlic and cook for 30–60 seconds until fragrant. If needed, deglaze the pan with a splash of beef broth to release browned bits. Once softened and golden, remove the aromatics from heat.
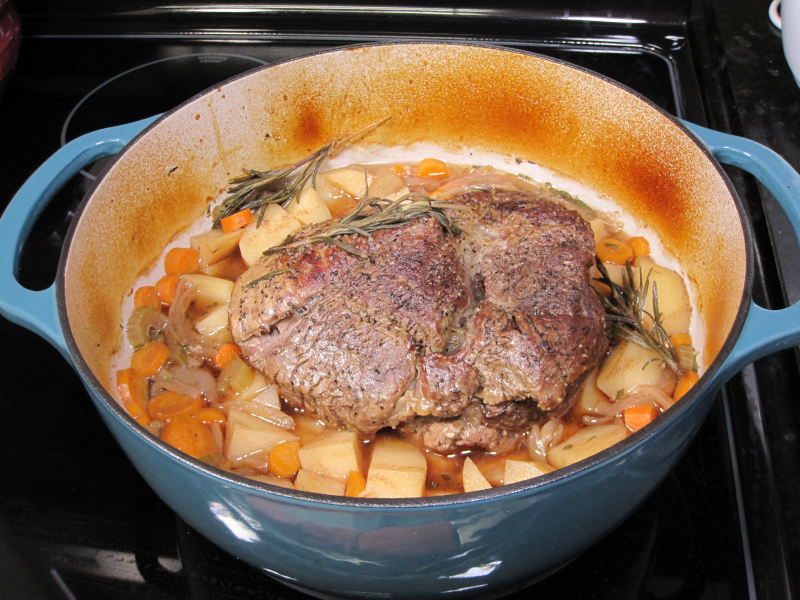
In the slow cooker insert, layer the chopped carrots and celery on the bottom. Place the seared roast on top, then add the sautéed onions and garlic over the meat.
If you’re prepping this the night before, wait to add the potatoes until the next morning—cubed raw potatoes can oxidize overnight, turning brown and looking unappetizing. For best results, chop and add the potatoes just before you start cooking.
In a small bowl, whisk together the beef broth, Worcestershire sauce, and tomato paste, then pour the mixture over the roast and vegetables when you’re ready to cook.
Cover and cook on LOW for 7–8 hours until the roast is fork-tender and the vegetables are soft. If needed, add an extra hour for tougher cuts.
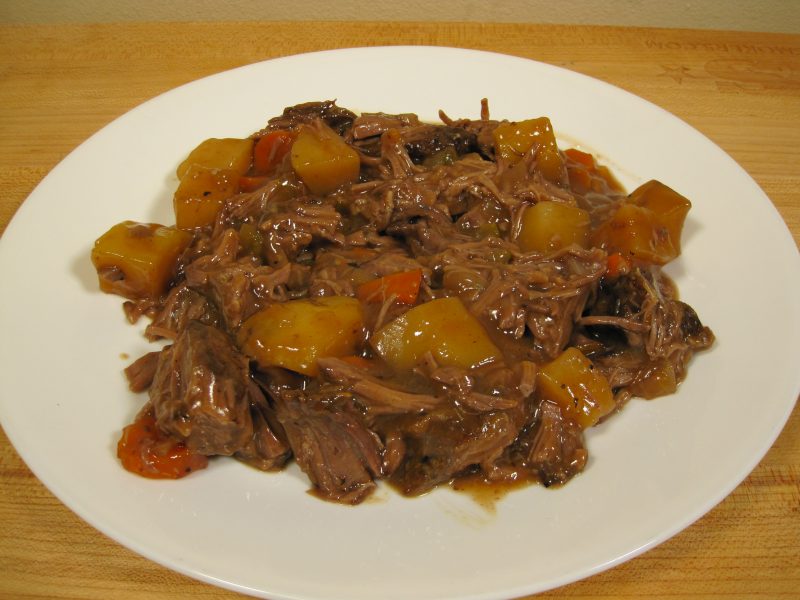
Once done, remove the roast and vegetables. Tent the roast with foil and let rest 10–15 minutes before slicing. Transfer the remaining liquid in the slow cooker to a saucepan on the stovetop over medium-high heat.
To thicken the gravy, mix 1 tablespoon cornstarch with 2 tablespoons cold water. Whisk the slurry into the simmering liquid and stir until it bubbles and thickens. Add more slurry if needed. Note: Cornstarch must reach 203°F to activate, so thickening is best done on the stovetop—not in the slow cooker.
Slice the roast against the grain or into bite-size pieces. Return the meat and vegetables to the gravy or serve everything separately. Enjoy!
 Print This Recipe
Watch How To Make This Recipe