


Oven Roasted Standing Rib Roast
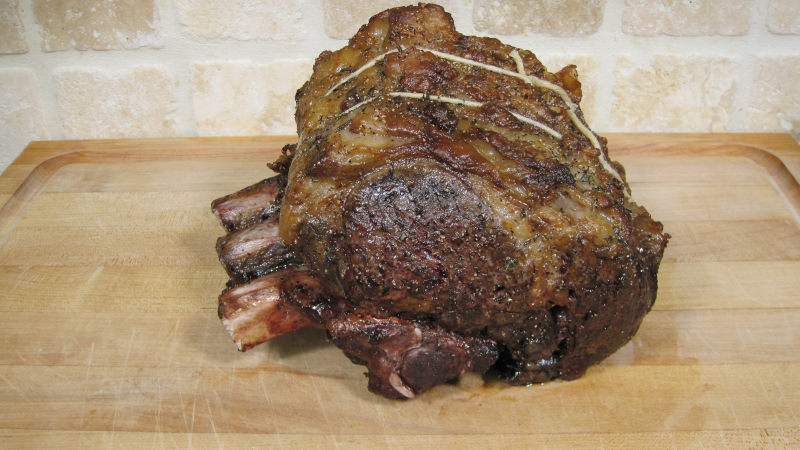
Nothing says holiday feast quite like a perfectly cooked bone-in ribeye roast. Whether it’s the centerpiece of your Christmas dinner or a special weekend gathering, this roast delivers a show-stopping presentation and unmatched flavor. With its tender, juicy interior and a beautifully caramelized crust, it’s a dish that embodies comfort, celebration, and a touch of culinary elegance.
This recipe combines the simplicity of traditional seasoning with the transformative power of a dry brine, allowing the natural flavors of the ribeye to shine. The low-and-slow cooking method ensures the meat is evenly cooked, while a final blast under the broiler creates a perfectly golden and crispy fat cap. And don’t worry, the rib bones—carefully tied back onto the roast—serve both as a flavor booster and a rustic finishing touch.
Whether you’re carving this at the holiday table or enjoying it with family and friends on a cozy weekend, this ribeye roast is sure to leave a lasting impression.
Man That’s Cooking
Ingredients
- 7 pound bone in rib eye roast
- 2 tsp kosher salt
- 2 tsp black pepper
- 2 tsp garlic powder
- 2 tsp fresh rosemary
Directions
First, use a chef’s knife and remove the rib bones by cutting along the bones to separate them from the roast. Set the rib bone plate aside on a cooling rack over a cookie sheet.
Next, carefully and lightly shave off any hard fat from the fat cap and remove any surface silver skin. This is an optional step as most roasts will be cleaned up by the butcher. But if you do trim, leave at least 1/4 inch of fat cap on the top of the roast.
Next, carefully slice a cross hatch pattern in the fat cap by only slicing the fat and not the meat.
Next generously apply kosher salt on all sides of the roast and the separated rib bones. Place the roast with the rib bones on the cooling rack which allows for airflow underneath the roast. Place this in the refrigerator for at least 24 hours and up to 4 days. This will dry brine the roast adding flavor to the meat while also tenderizing it.
After at least 24 hours of dry brine, remove the rib roast from the refrigerator and pre-heat a 12 inch cast iron skillet on medium heat until it reaches between 475 and 500 F. Using tongs and or cotton liner with nitrile gloves, hold the roast into the skillet and brown each side for 2 – 4 minutes. Be aware of any smoke detectors nearby that may alert from the smoke of this step.
After searing the roast, apply garlic powder, black pepper, and finely minced fresh rosemary to all sides of the roast.
Place the roast back on top of the rib bone plate. Using butcher twine, tie the rib plate back in place with a loop between each rib bone.
Place the roast back on the cooling rack sheet pan, then place the temp probe into the center of the roast and set the alarm for 125F. Place the roast in an oven preheated to 200 F and cook roughly 4 to 5 hours until the alarm signals, or roughly 39 minutes per pound.
Remove the roast from the oven and lightly tent it with aluminum foil. Allow the roast to rest for 30 to 50 minutes.
Turn on the oven broiler on high or at least 450 F. Place the roast back in the oven for 5 minutes allowing the fat cap to darken.
Cut the butcher twine to remove the rib bones, then slice the roast to your desired thickness.
 Print This Recipe
Watch How To Make This Recipe
Oven Roasted Marinated Rack of Lamb
Oven Roasted Marinated Rack of Lamb
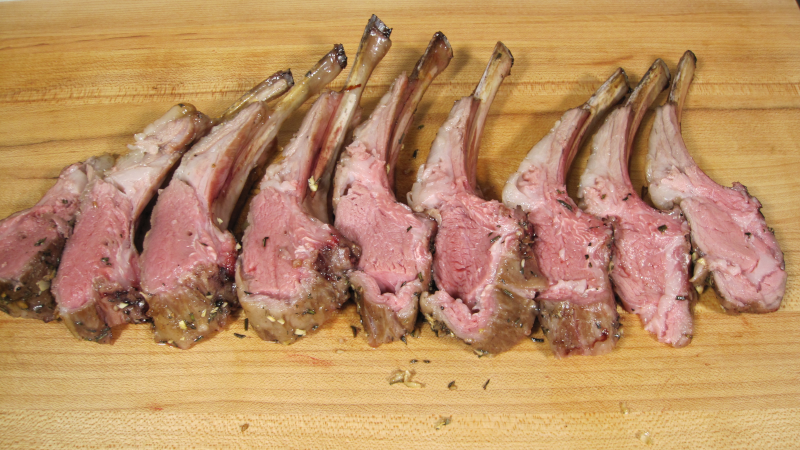
Elevate your next dinner with an elegant and flavorful oven-roasted rack of lamb, marinated to perfection. This dish combines the natural tenderness of lamb with a rich, herbaceous marinade featuring fresh rosemary, garlic, and a hint of balsamic vinegar. The marinade deeply infuses the meat with a blend of savory, tangy, and aromatic flavors, making each bite a memorable experience. By crosshatching the fat cap, seasoning with salt, pepper, and rosemary, and roasting the lamb to golden perfection, you’ll achieve a dish that’s as visually stunning as it is delicious. This recipe’s simplicity and sophistication make it ideal for a special occasion or a cozy family dinner. With just a few fresh ingredients, a little preparation, and the right technique, you’ll create a centerpiece worthy of any gathering.
Man That’s Cooking
Ingredients
- 1 rack of lamb 1.64 lbs
- 2 garlic cloves minced
- 1 sprig rosemary
- 1/4 tsp salt
- 1/4 tsp black pepper
Marinade
- ¼ cup olive oil
- 1 tbsp balsamic vinegar
- 2 garlic cloves minced
- 1 sprig rosemary
- 1/2 tsp salt
- 1/2 tsp black pepper
- 1/2 tsp onion powder
Directions
In a small bowl, whisk together all the marinade ingredients until fully combined. Alternatively, you can place the ingredients in a blender or food processor and pulse until smooth.
Using a sharp knife, remove any silver skin found on the meat. Score the fat cap in a crosshatch (chessboard) pattern using a sharp knife, being careful not to cut into the meat.
Place the rack of lamb in a shallow dish or a resealable plastic bag. Pour the marinade over the lamb, ensuring that it coats all sides evenly. Cover the dish with plastic wrap or seal the bag, removing as much air as possible.
Place the lamb in the refrigerator to marinate for at least 4 hours, but no longer than 12 hours.
Take the marinated lamb out of the refrigerator about 30 minutes before cooking to let it come to room temperature. Pat the lamb dry with paper towels to remove excess marinade.
Position the rack of lamb bone-side down on the cooling rack over a cookie sheet. This setup allows for even air circulation and prevents the lamb from sitting in its juices.
Season all sides generously with salt and pepper. Mince a fresh sprig of rosemary and two garlic cloves and press this into all sides of the lamb.
Preheat the oven to 250 F for low and slow for tender and pink to the edges (about 1 hour to 1.5 hours cook time). Or for a faster cook with a golden outer crust, preheat to 450 F (cook for 10 minutes then reduce to 325 F for about 20 minutes).
Cook the lamb using a thermometer probe and remove from the oven when your desired doneness is reached. 125°F (52°C) for rare to medium-rare, 135°F (57°C) for medium.
Rest the lamb for 5 minutes, then slice the rack of lamb between the bones to create individual chops.
Print This Recipe
Watch How To Make This Recipe
Butterlicious Butterball Turkey
Butterlicious Butterball Turkey
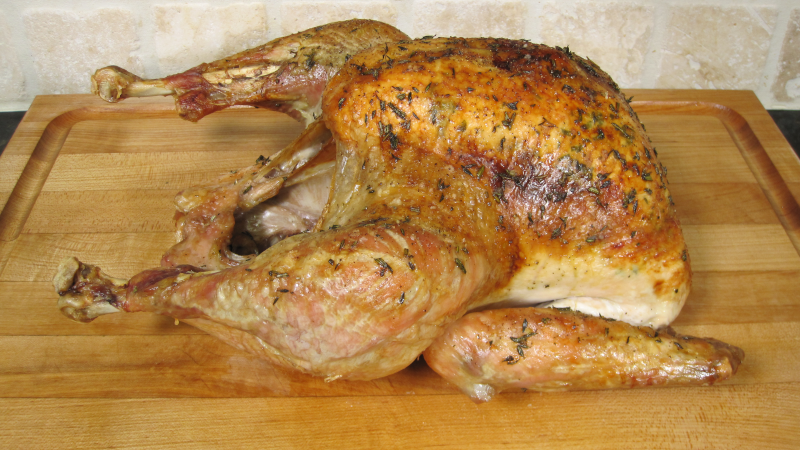
When it comes to Thanksgiving or any special gathering, nothing beats a perfectly roasted turkey. Our Butterlicious Butterball Turkey is all about simplicity and rich, buttery flavor. This recipe takes a classic Butterball turkey and elevates it with an herb-infused butter featuring fresh thyme and rosemary, carefully placed under and on top of the skin to ensure every bite is moist and flavorful. Seasoned generously with salt and pepper, the turkey roasts to a golden-brown perfection.
And it doesn’t stop there—using the neck and giblets, you’ll create a velvety gravy made from the fond in the roasting pan and a simple flour-and-butter roux. This is the turkey dinner your family will be talking about long after the plates are cleared!
Man That’s Cooking
Ingredients
- 13 lb whole turkey
- 8 sprigs thyme picked from the stem
- 2 sprigs rosemary
- 4 sprigs thyme
- 1 tsp kosher salt
- 1 tsp black pepper
Gravy Ingredients
- 4 tbsp butter
- 4 tbsp all purpose flour
Directions
Finely chop fresh thyme and rosemary. In a small bowl, mix 1 stick of softened butter with the minced herbs until well combined. Set aside.
Preheat your oven to 425°F. Pat the turkey dry with paper towels, both inside and out. Gently separate the skin from the breast meat using your thumbs and fingers. For hard-to-reach spots, use a small spatula or spoon to carefully lift the skin, being careful not to tear it.
Using a spoon, scoop small amounts of the herb butter mixture and place it under the skin of the breast. Push the butter from the breast down towards the thigh, ensuring the butter reaches the leg and thigh crevices. Use your fingers to smooth the butter across the breast and thigh areas under the skin, spreading it evenly.
Pat the turkey skin dry once again to ensure crispness. Rub the remaining herb butter mixture all over the outside of the turkey. If the butter won’t stick, melt it in the microwave for 20 seconds and brush the melted butter over the skin.
Generously season the turkey all over with salt and pepper, both inside the cavity and on the skin.
Place the prepared turkey in a roasting pan on a rack. Begin by roasting the turkey at 425°F for 20 minutes to develop a nice golden-brown color on the skin. After 20 minutes, you have two options for continuing the cooking process. For Method A, reduce the oven temperature to 350°F and continue roasting the turkey until the breast reaches an internal temperature of 165°F. For Method B, reduce the temperature to 350°F for 1 hour. After that hour, reduce the oven temperature again to 325°F for the remainder of the cook. This more gradual approach will allow for even heat distribution, finishing the turkey more gently without burning or drying it out.
If you follow Method A (425°F for 20 minutes, then 350°F until the breast reaches 165°F), the cook time will be approximately 13 to 15 minutes per pound. For a 13-pound turkey, the total cooking time would be around 3 to 3.25 hours.
If you follow Method B (425°F for 20 minutes, 350°F for 1 hour, then 325°F until the breast reaches 165°F), the cook time will be approximately 15 to 17 minutes per pound. For a 13-pound turkey, the total cooking time would be around 3.5 to 3.75 hours.
While the turkey is roasting, submerge the giblets and neck with 4 – 5 cups of water in a sauce pan. Boil the water on high then reduce the temperature to medium or medium low to simmer the water for 2 hours. Remove the neck and giblets and let them cool, then chop some of the giblet and neck meat for the gravy. Strain the remaining liquid and set aside.
Remove the turkey from the oven when the internal temperature of the breast reaches 165°F and the thighs reach 175°F. Let it rest on a cutting board for 20-30 minutes before carving. This allows the juices to redistribute, resulting in a juicier bird.
While the turkey is resting, keep the roasting pan warm over the stovetop burners on medium. Add the liquid from the boiled neck and giblets to the roasting pan. Use a wooden spoon to scrape up any fond on the bottom of the roasting pan.
In an 8 inch skillet on medium heat add 4 tablespoons of butter. While stirring the butter, add 1 tablespoon of all purpose flour then stir to mix it together. Continue to add the 3 remaining tablespoons of flour one at a time. Stir for roughly 10 minutes until a beige roux is formed. Stir in half of the liquid from the roasting pan into the butter flour mixture and stir everything together. Add the remaining liquid then add the neck and giblet meat some fresh thyme to the gravy. Lower the burner to low to keep the gravy warm and serve with the turkey and sides.
Print This Recipe
Watch How To Make This Recipe
Pellet Smoked Jerk Turkey
Pellet Smoked Jerk Turkey
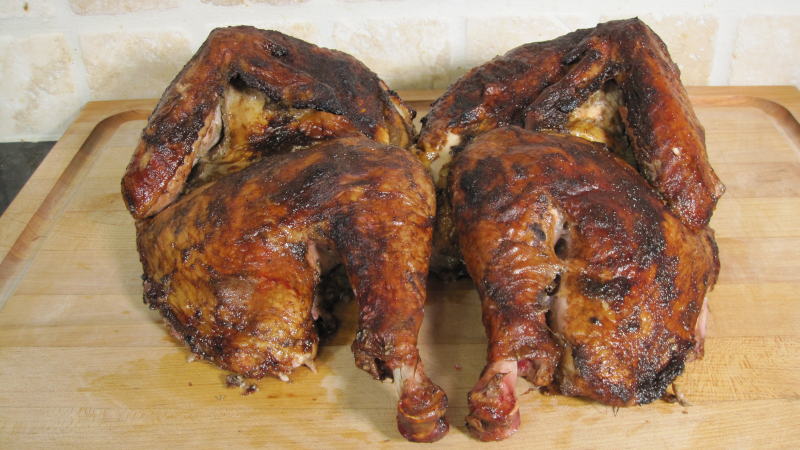
Get ready to elevate your Thanksgiving or holiday feast with a bold and flavorful twist — pellet smoked jerk turkey! This recipe takes the traditional roast turkey and infuses it with the vibrant, spicy, and aromatic flavors of Jamaican jerk seasoning. The turkey, cut in half for even marination, absorbs the mouthwatering jerk marinade made with fresh green onions, fiery Scotch bonnets, fragrant thyme, zesty citrus, and a medley of spices like cinnamon, allspice, and nutmeg.
The marinade not only penetrates the turkey meat for deep, bold flavor, but also helps to tenderize it, ensuring a juicy and tender bite in every slice. The combination of soy sauce and brown sugar creates the perfect balance of savory and sweet, while the fresh grated ginger adds a hint of warmth and zing to each bite. Once coated with this rich marinade, the turkey is smoked at 275°F for 3 hours, infusing the bird with a kiss of smoky flavor from the wood pellets.
After the smoke, the heat is cranked up to 375°F to crisp and tighten up the skin, giving the turkey a beautiful, golden-brown finish. The result? A juicy, tender turkey with layers of complex jerk seasoning and a perfectly crisp exterior.
Whether you’re serving this for a special occasion or just craving an island-inspired meal, this Pellet Smoked Jerk Turkey is sure to be a standout dish at any gathering. Each bite is a fusion of smoky, spicy, and sweet flavors that will keep everyone coming back for more!
Man That’s Cooking
Ingredients
- 13 lb whole turkey
- 6 green onions
- 4 scotch bonnets
- 8 sprigs thyme picked from the stem
- 6 garlic cloves
- 1 peeled lime
- 1 peeled lime
- 1/4 cup white wine vinegar
- 1/4 cup soy sauce
- 3 tbsp vegetable oil
- 1 tsp cinnamon
- 2 tsp allspice
- 1 tsp nutmeg
- 1 tbsp kosher salt
- 1 1/2 tbsp brown sugar
- 1 tsp black pepper
- 1 tbsp fresh grated ginger
Directions
Start by spatchcocking the turkey, which means removing the backbone so the turkey can be flattened. Then, split the turkey completely in half, by cutting through the breast plate and wish bone.
If the turkey is still partially frozen (even after 3 days in the refrigerator), you may encounter some ice in the cavity. Be cautious when splitting the turkey; a cleaver is ideal for breaking the breastbone. Avoid using a chef’s knife unless you have experience with this technique.
In a blender or food processor, combine green onions, scotch bonnets, thyme, garlic, lime, orange, white wine vinegar, soy sauce, vegetable oil, cinnamon, allspice, nutmeg, kosher salt, brown sugar, black pepper, and fresh ginger. Blend until smooth.
Pour a small amount of the marinade onto the skin side of the turkey. Then, flip the turkey halves over and coat the inside (flesh side) generously with the remaining marinade. Ensure the marinade is well-distributed, especially in all the crevices.
Place the turkey halves in the refrigerator to marinate for up to 4 hours. The 4-hour marinade provides optimal flavor without causing the meat to become too tough from the citrus acids.
Set up your pellet smoker with apple or pecan wood and preheat to 275°F. Place the marinated turkey halves on the smoker with the skin side up. Smoke the turkey at 275°F for approximately 3 hours until the breast meat reaches 150F.
Keep an eye on the turkey’s internal temperature:
After about 1.5 hours, the breast should reach around 100°F, and the skin will begin to take on some color.
At around 2.5 hours, the temperature should approach 130-140°F. The skin will darken further, and the jerk marinade will develop a deep, rich color.
Monitor closely as the temperature rises at around 20°F per hour.
Once the turkey reaches 150°F in the breast (after about 3-3.5 hours), increase the smoker temperature to 375°F. Continue cooking the turkey for an additional 30-45 minutes, or until the internal temperature reaches 165°F in the breast and 175°F in the thighs
Remove the turkey from the smoker at 165°F (breast temp). Allow it to rest for 20 minutes. This will allow the juices to redistribute within the meat.
Slice the turkey and enjoy!
Print This Recipe
Watch How To Make This Recipe
