Lemon Pepper Smoked Turkey
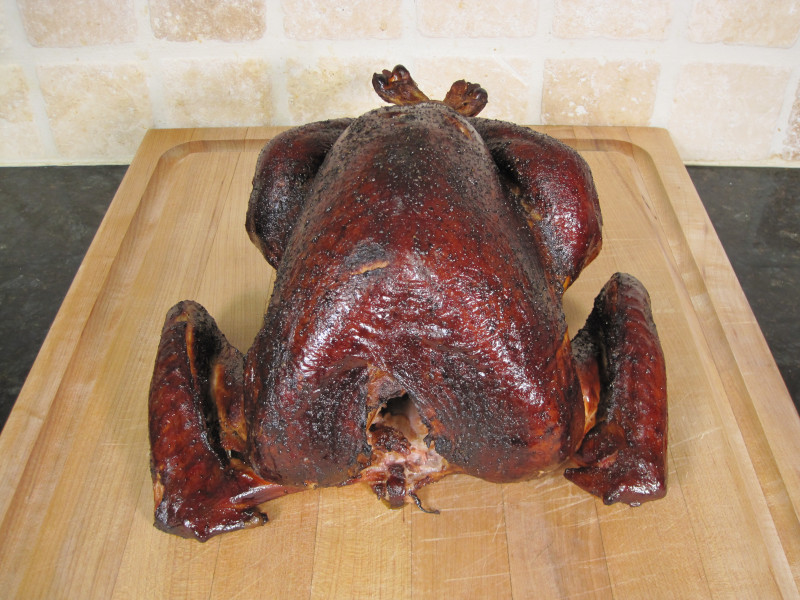
Turkey isn’t just for Thanksgiving—it’s the centerpiece of many holiday tables, from Christmas and Easter to New Year’s and even Fourth of July cookouts. This citrus-herb smoked turkey recipe brings a fresh and smoky twist to the traditional roast, perfect for impressing guests at any festive gathering. With bright lemon, fragrant rosemary and thyme, and a kiss of cherry and hickory smoke, this bird delivers a flavorful profile that fits right in alongside your favorite holiday sides.
This step-by-step recipe guides you through the entire process: a fragrant brine, proper seasoning, trussing for even cooking, and a low-and-slow grill setup to keep the meat juicy and tender. Real-world cooking notes are included to help you avoid dry breast meat, get that perfect skin, and master fire management on the grill. Whether you’re hosting Easter brunch, Christmas dinner, or a patriotic July feast, this method gives your turkey the attention it deserves.
Man That’s Cooking
Ingredients
- 12 – 13 lb whole turkey
- 2 lemons, quartered
- 1 sprig thyme
- 1 sprig rosemary
- 1 sprig sage
- 3 tbsp olive oil
- AP rub (salt, pepper, garlic powder mix)
- 4 tbsp melted butter (for basting)
- 3 tbsp olive oil
Brine Ingredients
- 1 gallon water
- 1 cup kosher salt
- 1 tbsp black peppercorns
- ½ tsp ground black pepper
- 2 lemons, sliced
- 2 sprigs rosemary
- 2 sprigs thyme
- 1 sprig sage
Directions
Brine the Turkey (Up to 24 Hours Before Cooking)
In a large pot (8 qt or larger), add 1 gallon of water. Stir in kosher salt, black peppercorns, ground black pepper, lemon slices, rosemary, thyme, and sage. Once boiling, remove from heat and let it cool until warm (not scalding). Transfer to a smaller container and refrigerate to cool completely. Place the turkey in a large zip-seal bag. Pour the cooled brine over the turkey, seal the bag, and refrigerate for up to 16 hours.
Prep the Turkey (1-2 Hours Before Cooking)
Remove the turkey from the brine, rinse it under cold water, and pat it dry with paper towels. Place on a cookie sheet with a cooling rack to let excess moisture drain. (Optional) Place in the refrigerator for 1 – 4 hours to dry the skin further. Slice under the legs and wing drums to help with even cooking. Season the turkey cavity with AP rub. Stuff the cavity with quartered lemons, thyme, and rosemary. Rub the turkey skin with olive oil, then season generously with AP rub on all sides. Tie the legs together using butcher’s twine to ensure even cooking.
Clean the grill and set up for indirect heat with an empty bottom grill grate. Place the chimney starter in the center and light the charcoal. Once coals are hot, dump them onto one side of the grill.
For a PK 360, Adjust vents: Bottom vent under the coals → Half open Bottom vent away from the coals → Closed Top vent above coals → Closed Top vent opposite coals → Open
Place a water pan in the bottom of the grill, filling it halfway with water. Place cherry and hickory wood chunks on the coals. Put the main grill grate over the pan, leaving the door section off for easy coal access.
Cook the Turkey (Approx. 3-4 Hours)
Place the turkey on the grill breast side away from the fire. Start the cook at a temperature between 260°F – 300°F and maintain it there. Avoid temps over 315°F. After 1 hour, begin brushing the turkey skin with melted butter every hour. This helps lock in moisture and improve skin texture. After 2 hours, rotate the turkey so the breast faces the fire. Add more charcoal and wood chunks as needed. Insert a temperature probe into the thickest part of the breast. Pull the turkey when the breast reads 155°F — 160°F and carryover cooking will bring it to a safe temp while resting. Cook until internal temps reach:
• Breast: Pull at 155°F – 160°F
• Thighs: 170–175°F
Rest & Serve
Remove turkey from the grill and let it rest for at least 30 minutes before slicing. Carve and serve!
 Print This Recipe
Watch How To Make This Recipe