


Grilled Marinated Skirt Steak Fajitas
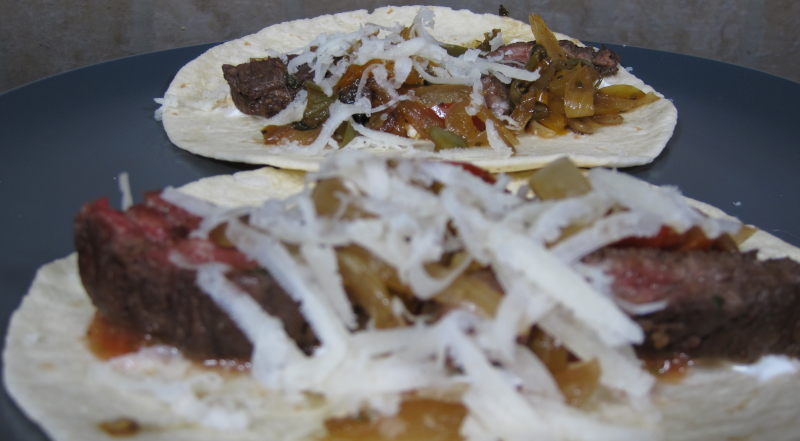
Get ready to tantalize your taste buds with an explosion of savory and zesty flavors! Today, we’re bringing you an absolute Tex-Mex favorite – Grilled Marinated Skirt Steak Fajitas. This dish is a celebration of tender, marinated skirt steak, perfectly complemented by a medley of colorful bell peppers and onions, all cooked to perfection on the grill.
The heart of this recipe lies in the mouthwatering marinade we’ve carefully crafted. It’s a symphony of flavors, combining the richness of soy sauce, the tangy brightness of lime, and the fresh aroma of cilantro. To add a kick of spice and depth, we’ve infused it with chili powder and cumin, along with the bold punch of jalapeno pepper and onion.
Once the skirt steak has been marinating and soaking up all those fantastic flavors, it’s time to hit the grill! As the sizzling sounds fill the air, the tantalizing aroma will surely draw a hungry crowd. Prepare for an irresistible combination of smoky charred edges and juicy tenderness that will have you craving more with every bite.
Now, let’s talk about those colorful bell peppers and onions. Grilling them adds a delightful smokiness, while their vibrant hues bring a visual feast to your plate. Once cooked to perfection, they join forces with the marinated skirt steak to create the perfect filling for our fajitas.
When it’s time to assemble, grab those soft flour shells and load them up with the grilled marinated skirt steak and the colorful pepper and onion medley. The combination of textures and flavors is a true fiesta for your taste buds.
Man That’s Cooking
Ingredients
- 2 pounds outside skirt steak
- 1/4 red onion
- 1 yellow onion
- 1 red bell pepper
- 1 green bell pepper
- 1 yellow bell pepper
- 1 jalapeno pepper
- 1/2 cup cilantro
- 2 garlic cloves
- 1 lime
- 1/2 cup corn oil
- 1/4 cup soy sauce
- 3 tsp chili powder
- 2 tsp cumin
- 1 tsp chili powder
- 10 fajita shells
- 6 oz Monchego cheese
Directions
First step is to make a marinade for the skirt steak. Finely chop 1/4 red onion and 1 jalapeno pepper with the seeds removed. Combine this in a container or zip seal bag with 1/4 cup chopped cilantro, 2 minced garlic cloves, 1/2 cup corn oil, 1/4 cup soy sauce, juice of 1 lime, 3 teaspoons chili powder, 2 teaspoons cumin, and 1 teaspoon black pepper.
Next cut the skirt steak into 3 even parts, then add the steak to the marinade. Coat all sides with the marinate and place it in the refrigerator for 4 – 6 hours.
Next prepare the veggie mix by slicing the bell peppers and the yellow onion and place this into a large mixing bowl. Add 1/4 cup of chopped cilantro, roughly 1 tablespoon of corn oil, 3/4 teaspoon of chili powder, 1/2 teaspoon cumin and 1/2 teaspoon of black pepper. Mix everything together for a few minutes until the veggies are evenly coated.
Preheat your grill with one side on a medium heat and the other on a medium high heat. Place a 12 inch cast iron skillet or a metal grill basket over the medium heat side. After about 5 – 10 minutes, add some corn oil to the skillet or rub down the grill basket with oil. Add the veggies and cook them for about 5 minutes then add the steak to the medium high side of the grill. Keep the lid open and grill the steak for about 10 minutes flipping it over a few times. Stir the veggies around every few minutes. Pull the steak from the direct heat when it reaches 130 F.
Let the steak rest for at least 5 minutes, then slice it against the grain so that each bite is tender. To do this, check the steak and you should be able to see lines and cracks running from the width of the steak. You want to cut at 90 degrees from those lines, so turn the steak to the side and slice against those lines instead of with the lines.
Warm Flour Shells: Begin by heating your soft and pliable flour shells. You can do this by wrapping them in foil and placing them on the grill for a minute or two. Alternatively, a quick warm-up in the microwave works just as well.
Lay down a generous portion of the marinated and perfectly grilled skirt steak in the center of your warm flour shell. The juicy, flavorful goodness will be the star of your fajita creation.
Next, load up your fajita with the beautifully grilled bell peppers and onions. The vibrant colors will not only make your fajitas look enticing but also add a delightful crunch and sweetness to each bite.
Now, it’s time to customize your fajitas with your favorite toppings. Whether you’re a guacamole aficionado, a salsa lover, or can’t resist a dollop of creamy sour cream – feel free to go all out! Shredded cheese, fresh cilantro, or a squeeze of lime juice will also add an extra layer of yumminess.
Carefully fold one side of the flour shell over the filling, then fold in the sides to secure the delicious contents. Roll it up, and voilà! Your fajita masterpiece is ready to be devoured.
 Print This Recipe
Watch How To Make This Recipe
Oven Roasted Eye Round Roast
Oven Roasted Eye Round Roast
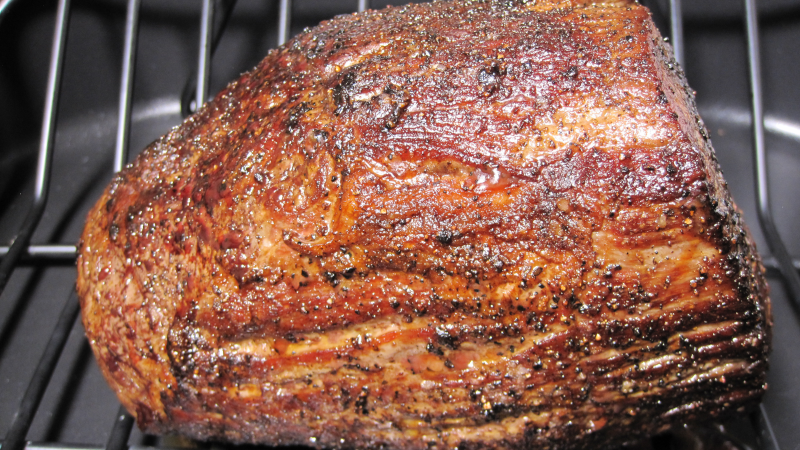
Roast beef can be made from a variety of cuts, and one of the best budget-friendly options is eye round roast—especially when it’s on sale at your local market. This recipe makes it easy to turn that lean cut into something flavorful and tender. While it’s simple to prepare, a digital meat thermometer (wired or wireless) makes a big difference in getting perfect results. Since this method relies on precise internal temperatures, you’ll want to avoid opening the oven door repeatedly, which makes handheld thermometers less ideal. A cast iron skillet is also helpful for getting a great sear before roasting. Once you’re set up with those basic tools, you’re ready to make roast beef at home that rivals the deli counter!
Man That’s Cooking
Ingredients
- 3.5 – 4.5 lb eye round roast
- 3 tsp kosher salt
- 2 tsp black pepper
- 2 tbsp olive oil
Directions
Salt all sides of the roast then wrap it in plastic wrap and refrigerate overnight.
Set the rack in the oven to the medium position. Preheat the oven to 225 F.
Dry the roast with paper towels, then rub it down with olive oil. Apply black pepper to all sides of the roast.
Heat a 10 or 12 inch cast iron skillet on medium high heat with a tablespoon of oil. When the oil starts smoking, sear the roast on each side for 3 minutes per side.
Transfer the roast to the rack in a roasting pan and roast in the oven until the center reaches 115°F. For reference, a 4-pound roast took about 1.5 hours at 225°F to reach this temperature. That works out to roughly 22 minutes per pound, but please keep in mind: this is a cook-by-temperature recipe, so times are just estimates. Oven performance, roast shape, and fridge chill can all affect how long it takes. A digital thermometer will give you the most accurate results.
Turn the oven off (but don’t open the door!) and let the roast continue cooking with the residual heat until it reaches 130°F internally. For a 4-pound roast, this final step took about 30 minutes, or roughly 7.5 minutes per pound. Once the roast reaches temp, remove it from the oven and let it rest for 15 minutes. Then slice thinly and enjoy—especially with a good horseradish sauce!
Print This Recipe
Watch How To Make This Recipe
Oven Roasted Brisket
Oven Roasted Brisket
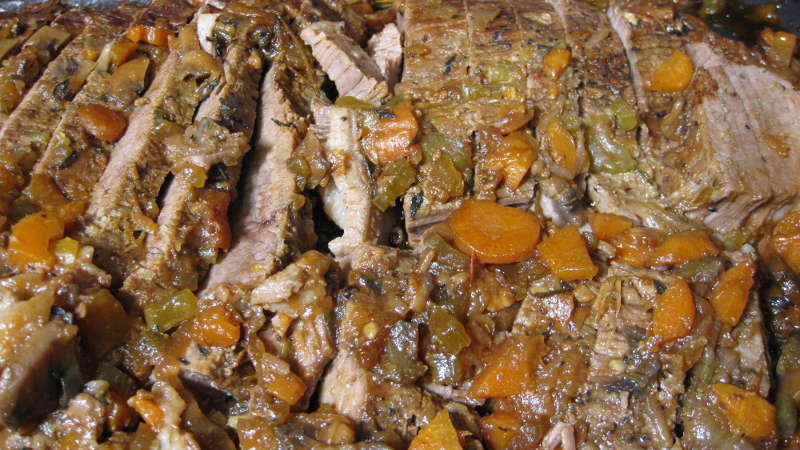
Brisket is growing in popularity thanks to the BBQ movement. But did you know that it is a traditional meal for the high holy days such as Rosh Hashanah and Passover? You can serve it for your Easter Sunday meal or you can make it on any given Sunday. In this recipe the brisket is braised in a covered roasting pan which makes it tender and juicy in about 4 hours. Carrots, celery, mushrooms and onions are combined with the brisket to give it that hearty pot roast deliciousness. Ideally you need to purchase a 5 pound prime brisket flat for this recipe. If you go smaller, just keep the quantity of the remaining ingredients the same.
Man That’s Cooking
Ingredients
- 1 4 – 5 pound brisket flat
- 2 white onions
- 3 carrots
- 3 celery stalks
- 8 oz white mushrooms
- 1/2 cup crushed tomatoes
- 4 cloves garlic
- 1/4 cup brown sugar
- 1 tablespoon apple cider vinegar
- 32 oz beef broth
- 2 tablespoons olive oil
- 6 sprigs fresh thyme
Directions
First dice the carrots and celery. Slice the onions on a fine mandolin blade. Wash and thinly slice the mushrooms. Mince the garlic cloves and set aside.
Next, trim the silverskin and excessive fat from the brisket. Then pat the brisket dry and rub it down with olive oil. Season both sides with a medium amount of salt and pepper.
Heat a large cast iron skillet on medium high heat and add a small drizzle of olive oil. Spread the oil around the skillet with a silicone spatula.
When the skillet reaches temperature, add the brisket to the pan fat side down first. Cook for 5 minutes then flip to the other side and cook for another 5 minutes.
Remove the brisket and place it in the roasting pan, fat side down. The roasting pan is the heat source and the fat will protect the meat while cooking. Preheat your oven at 325 F.
Add the diced vegetables (except garlic) to the skillet and cook for 5 minutes. Add 2 cups of beef broth, then add the tomatoes, brown sugar, cider and minced garlic. Use a wooden spoon to scrape up any crispy burnt beef fond from the pan surface.
Simmer for 4 minutes then pour everything over the brisket in the roasting pan. Add the remaining beef broth to the roasting pan. Toss in the sprigs of fresh thyme on the meat and to the side on the veggies.
Tightly seal the roasting pan with heavy duty aluminum foil. You may need to use 2 sheets for a good seal. Bake for 3 hours on the middle rack at 325 F. After 3 hours, check the brisket for tenderness by using a temperature probe or a toothpick. Push it into the meat and when it slides in with very little resistance, then it’s tender and ready. If it feels tough let it cook for another 30 minutes to 1 hour and check again. A 5 pound brisket flat will take about 4 hours at this temperature. It will register around 210 F in most areas when done.
When the brisket is tender, remove it from the oven and let it rest for at least 10 minutes before slicing. Slice it against the grain to produce the most tender cuts of meat.
Print This Recipe
Watch How To Make This Recipe
Sous Vide Corned Beef Brisket
Sous Vide Corned Beef Brisket
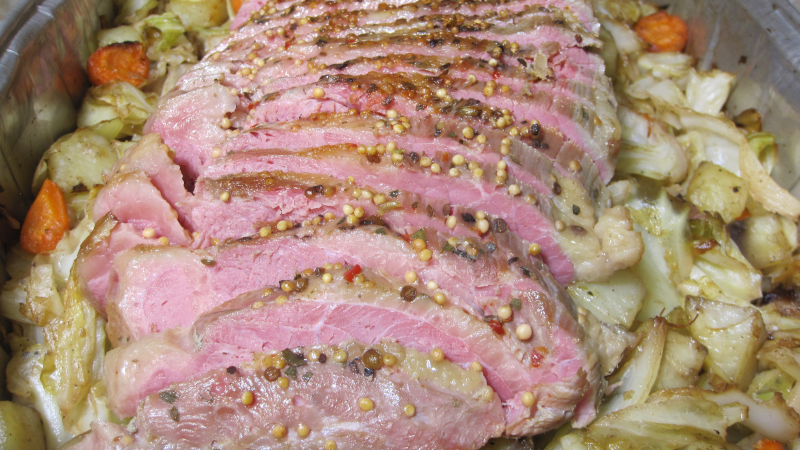
Sous vide what? So this is a highly controlled way of cooking that yields some very tasty results. It’s basically heating the water surrounding your food that is under pressure from vacuum sealing. Not only does this make food tender and juicy, it also keeps the flavor from steaming away. You will need some equipment such as a Sous Vide cooker and a cooking bin. You will also need a vacuum sealer and bags for best results. And for this cook you will need a lid for your cooking bin to keep the water from evaporating away. For this recipe you going to need a 2 to 4 pound corned beef flat. And, this will be a 48 hour cook so be prepared to make plans ahead of time and be sure you paid your electricity bill. Don’t let this long cook time prevent you from making this happen. Try this recipe at least once and you are likey to make this your go to St Patricks day corned beef meal.
Man That’s Cooking
Ingredients
- 2 – 4 pound Corned Beef Flat
- 3 Russet Potatoes
- 6 Carrots
- 1 Cabbage
- 1 Stick Butter
Directions
Remove the corned beef from the packaging and wash off the red fluid. Next, dry the corned beef with paper towels. Apply the seasoning packet to both sides while patting the seasoning into the meat. Place the beef into a large vacuum seal bag and then seal it up with the vacuum sealer.
Place the vacuum sealed corned beef into the sous vide cooking container. Fill the container with water to the top level with the beef in the container. This will make sure you have the proper level of water in the container. Remove the beef then start the sous vide cooker with the temperature set at 140 F.
When the water reaches 140 F place the beef into the cooking container and set a timer for 48 hours. Near the 48 hour mark, you can start cooking the potatoes carrots and cabbage.
Peel then slice the carrots into small chunks. Next peel and slice the potatoes into small chunks. Melt a half stick of butter in a large cast iron skillet. Cook the carrots and potatoes for about 20 minutes or until browned.
Remove the browned outer leaves from the cabbage. Slice the cabbage in half then cut out the core from both halves. Place each half cut side down then slice the halves into strips. Melt a half stick of butter in a large cast iron skillet. Cook the cabbage for about 20 minutes or until browned.
Combine the carrots, potatoes, and cabbage together and keep them warm in the oven at 300 F while you work on the corned beef.
At 48 hours, remove the vacuum sealed corned beef from the water. Next cut open the vacuum seal bag and carefully remove the beef using heat gloves or tongs. Be careful not to spill any liquid from the bag and discard it in the sink. Dry the corned beef with paper towels.
Heat a skillet at medium high temp and add some avocado oil. When heated, lay the corned beef fat cap side down into the skillet and brown it for 2 minutes. Flip to the other side and brown for 2 minutes. Remove the beef and place it on a cutting board. Slice the beef against the grain and place the slices on top of the potato carrot cabbage mixture.
Print This Recipe
Watch How To Make This Recipe
