


Oven Roasted Boneless Rib Roast
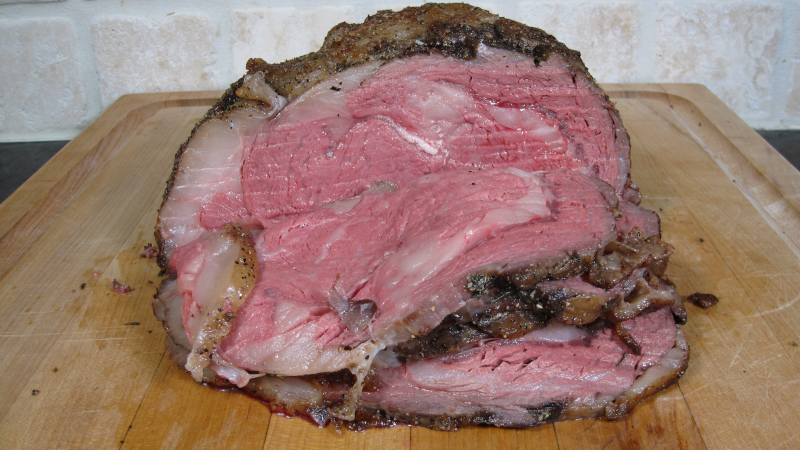
In this recipe, we’re diving into the world of succulent, melt-in-your-mouth Oven Roasted Boneless Rib Roast. This classic dish is the epitome of indulgence and is sure to be the centerpiece of your next feast.
Our star of the show is a magnificent 7-pound boneless rib eye roast, promising tender perfection in every slice. To elevate its natural richness, we’ll generously season it with the timeless trio of salt, pepper, and a hint of aromatic garlic powder. Then, we’ll invite the vibrant freshness of thyme to dance on this beautiful canvas of flavors.
But before the magic truly begins, we’ll start by giving this magnificent roast a warm, rustic embrace. In a trusty cast iron skillet, we’ll carefully brown the roast on all sides, locking in those precious juices and setting the stage for a mouthwatering masterpiece.
Now, here comes the pièce de résistance: the gentle roasting in the oven. Set at a low and slow 200°F (93°C), the oven will work its magic, slowly coaxing the flavors to meld and the meat to become incredibly tender. This method ensures an even and controlled cook, ensuring that every bite is a symphony of succulence.
After the oven has worked its magic, our roast will need a well-deserved rest. A half-hour of resting time, during which the roast will relax and redistribute its juices, will result in a texture that’s incredibly juicy and incredibly delicious.
So, whether you’re celebrating a special occasion or simply seeking to elevate your everyday dinner, our Oven Roasted Boneless Rib Roast is the answer. With its tender texture, flavorful seasoning, and that inviting aroma that fills your home, this roast will make a lasting impression on your taste buds and in the hearts of your loved ones.
Man That’s Cooking
Ingredients
- 7 pound boneless rib eye roast
- 2 tsp kosher salt
- 2 tsp black pepper
- 2 tsp garlic powder
- 2 tsp fresh thyme
Directions
First, carefully and lightly shave off any hard fat from the fat cap and remove any surface silver skin. This is an optional step as most roasts will be cleaned up by the butcher. But if you do trim, leave at least 1/4 inch of fat cap on the top of the roast. Next, carefully slice a cross hatch pattern in the fat cap by only slicing the fat and not the meat.
Next generously apply kosher salt on all sides of the roast. Place the roast on a cooling rack on a cookie sheet to allow for airflow underneath the roast. Place this in the refrigerator for at least 24 hours and up to 4 days. This will dry brine the roast adding flavor to the meat while also tenderizing it.
After 24 hours of dry brine, remove the rib roast from the refrigerator and truss the roast using butcher twine. This helps keep the meat in an even shape while cooking so that it will cook evenly. If your roast is mostly a uniform shape, you can make this an optional step.
Pre-heat a 12 inch cast iron skillet on medium heat until it reaches between 500 and 550 F. Using silicone or cotton with nitrile gloves, hold the roast into the skillet and brown each side for 2 – 4 minutes. Be aware of any smoke detectors nearby that may alert from the smoke of this step.
After searing the roast, apply garlic powder, black pepper, and finely diced fresh rosemary to all sides of the roast.
Place the roast on the same cooling rack and cookie sheet used for the dry brine, then put it on the middle rack of a 200 F preheated oven.
Roast in the oven until the temperature probe alerts on 125 F, or roughly 39 minutes per pound. Remove the roast from the oven and lightly tent it with aluminum foil. Allow the roast to rest for 30 minutes. During this time, carryover cooking will raise the temperature by around 10 degrees making the roast a perfect color on the inside. After resting, slice to serve and enjoy.
 Print This Recipe
Watch How To Make This Recipe
Pellet Smoked Cajun Butter Turkey
Pellet Smoked Cajun Butter Turkey
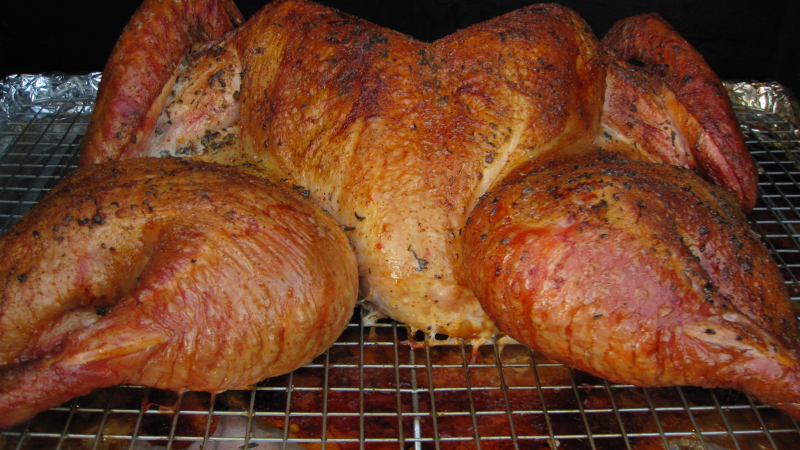
Holiday time is here again and your family is looking forward to your smoked turkey. And this year it’s time to give them a different flavor of buttery creole goodness. Now don’t worry, this is not spicy and grandma won’t need a tall glass of milk to cool down the burn. This recipe uses Tony Chachere’s cajun butter injection which has a very buttery flavor with a little bit of kick. If you haven’t tried this before, you should give it a taste before injecting so you know what you are working with. But that’s not all, we’re going to add a creole seasoning herb butter underneath and on top of the turkey skin! Just smoke it for a few hours at 250F then crank the heat to 375F to crisp up the skin. Take it off the smoker when the breast hits 165F, let it rest, then slice in and be amazed at how juicy this turkey is.
Man That’s Cooking
Ingredients
- 10 – 15 lb whole turkey
- 1 bottle Tony Chachere’s cajun butter injection
- 1 stick unsalted butter
- 1 tsp fresh rosemary
- 1 tsp fresh sage
- 1 tsp fresh thyme
- 3 – 5 tbsp Tony Chachere’s creole seasoning
Directions
Thawing
Usually your turkey will be fully frozen and if so let it thaw out in the refrigerator for at least 48 hours.
Spatchcocking
When the turkey is thawed, remove it from the packaging and remove any giblets and pop up thermometers. Next, cut out the backbone using kitchen shears or a chef’s knife. Cut from the tail along the side of the backbone up to the neck. Repeat this step on the other side of the backbone and remove it completely. Following this, cut the breastbone in the center and now you can flatten out the turkey. This flattening of the bird is called spatchcocking and it will allow the breast and thigh meat to reach their finishing temperatures at the same time. And don’t throw way that backbone, it’s perfect for making gravy or turkey broth!
Injecting
For this recipe, we are using a bottle of Tony Chachere’s cajun butter injection. You may end up using only half the bottle per turkey so pour the injection into another container and do not stick your injection needle directly into the bottle. That will cross contaminate the injection liquid with raw turkey and besides that, it’s just easier to use a wider mouth container. Use your injection needle to pump the turkey up with all the injection liquid as possible. Inject the thighs, legs, wings and breasts and move the needle around to inject multiple points. Putting too much liquid in one area will create a pocket of injection, which is not a bad thing but will be noticeable.
Butter Rub
Use one stick of room temperature unsalted butter and mix with 1 tablespoon of Tony Chachere’s creole seasoning. Add about a teaspoon each of fresh chopped sage, thyme, and rosemary then mix everything together. Next use a small silicone spatula to separate the skin from the meat starting at the neck area and working around to the thighs. Next you can put some seasoned butter on the spatula and work it down underneath the skin. Use your fingers above the skin to spread the butter around. If you are careful you can separate the skin from the thigh meat and get some seasoned butter there as well.
Seasoning
Flip the turkey over and use Tony Chachere’s creole seasoning to coat the inside of the turkey. You can be heavy handed with the seasoning if you like, this is a big piece of meat! Flip the turkey back over and season the skin side. Next rub on the remaining seasoned butter then add the remaining herbs. Add one light coat of creole seasoning for good looks and flavor.
Smoking
Turkey can be smoked at temperatures ranging from 225F up to 325F. However there are some food safety concerns when smoking a turkey larger than 15 pounds at 250F or less. For this recipe we recommend using a turkey less than 15 pounds and smoking at 250F using a wood such as apple, pecan or hickory. Your total cook time will vary depending on the total weight of the turkey and cooking temperature. A 14 pound turkey would take around 4 hours more or less of cook time. The problem with a smoke temperature lower than 300F will be rubbery skin or at least skin that is not crisp and possibly chewy. To help fix this, you will need to crank up the heat of your smoker to 375F when the breast reaches an internal temp of 150 – 155F. Let the turkey continue to cook and when the turkey reaches around 165F in the breast and 175F in the thigh, remove it from the smoker and let it rest uncovered. If you cover the turkey for too long, the steam will work against you and moisten the skin. Just let it rest 15 minutes to allow carryover cooking to do it’s job and work the juices around. After resting, carve into that turkey and be ready to deal with a cutting board full of juices!
Print This Recipe
Watch How To Make This Recipe
Buttery Stuffing
Buttery Stuffing
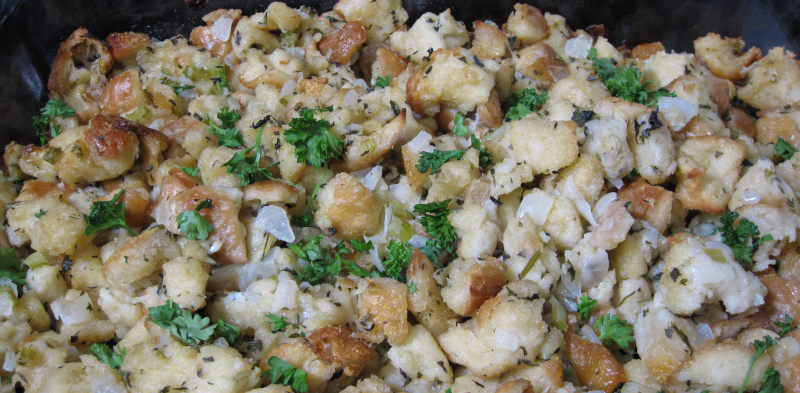
Every holiday meal needs a good homemade stuffing. Of course this takes more effort than making instant stovetop stuffing, but the flavor and texture is so much better. This recipe is based on typical classic stuffing recipes but we added more butter for a fluffy croissant taste. Of course you could modify this recipe as you like to match your taste. If you are short on time, you can do all the chopping and dicing a day ahead of time. You can also dry out the bread a day before and store it in large zip seal bags. When it’s time to cook the stuffing mixture, keep in mind you will need at least 1.5 hours baking time. You can get this done early on the holiday and just warm it up when your main dish is ready. One thing is certain, once you make home made stuffing, this will be a repeat dish every year!
Man That’s Cooking
Ingredients
- 1 lb sourdough bread
- 4 celery stalks
- 1 yellow onion (medium)
- 3 garlic cloves
- 1 cup (2 sticks) unsalted butter
- 1 tsp fresh sage
- 1 tsp fresh thyme
- 1 tsp fresh rosemary
- ½ cup fresh parsley
- 2 eggs
- 2 cups (or 14.5 oz can) chicken broth
Directions
First, preheat the oven to 250F. Next use a bread knife and cut the bread into ½ inch slices. Cut each slice into 3 – 4 strips roughly ½ inch wide. Finally, stack the 3 strips together and slice out ½ inch cubes. Spread the cubes flat on several cookie sheets without stacking any bread on top of eachother. Place the cookie sheets in the oven for 20 minutes then remove them and check the bread cubes for any moisture. All cubes should be solid and not squishy. If any are squishy, continue to bake them for another 20 minutes. Repeat this until all bread cubes are solid, then remove the bread and increase the oven temperature to 350F.
While the bread is baking, chop the onion, celery and herbs. Set aside unchopped parsley for a final topping. Melt the butter in a large skillet over medium heat. Add the onion and celery and cook for 8 minutes stirring occasionally. Add the garlic and herbs then cook for 1 minute more then remove the skillet from the heat.
Transfer the bread cubes to a large bowl. Pour about ⅓ of the melted butter onion mixture over the bread and toss to coat evenly. Pour another ⅓ and mix again. Repeat once more with the remaining butter mixture.
In a medium bowl, mix together the eggs and chicken broth. Pour ⅓ of the mixture over the bread and toss again to coat evenly. Repeat twice more then transfer the bread to a greased 9 x 13 baking dish. Cover with foil and bake at 350F for 45 minutes. Uncover and stir the stuffing. Cook uncovered for another 20 minutes then stir the stuffing again checking for moisture and brown coloring on the bread. The bread should be brown and partially moist but not soaked and uncolored. Repeat this 20 minute cook several times if needed. When the bread reaches your desired doneness, rest for 5 minutes then top with the parsley that was set aside.
Print This Recipe
Watch How To Make This Recipe
Pellet Smoked Turkey Legs (Disney Style-ish)
Pellet Smoked Turkey Legs
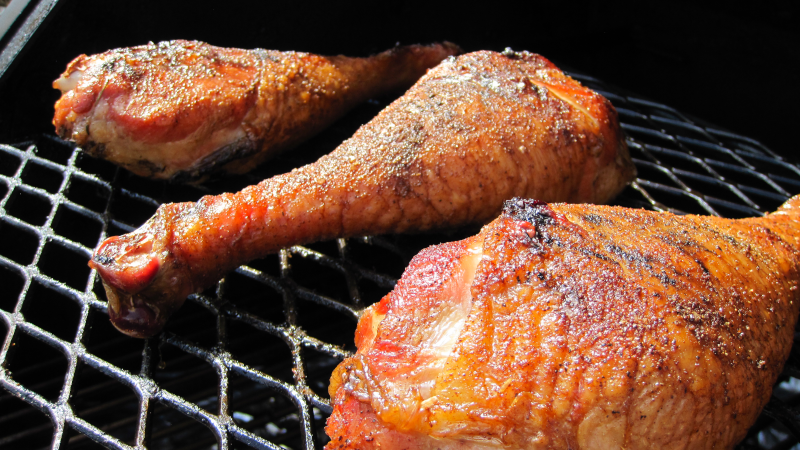
Everyone loves smoked Disney turkey legs and we searched the inter webs for the best Disney style recipe. We found most recipes to vary from each other and it started to seem like nobody really knows the recipe, just like KFC’s secret herbs and spices. So we’re not going to claim this recipe to be the actual Disney formula, but it is a mashup of a few good ones with our own spin on the spices and steps. This recipe is easy but it does take some time from start to finish. You will need to make a brine and soak the turkey legs overnight in that mixture. This adds a great level of flavor to the meat and helps to keep the meat moist. After the brine, you should dry out the turkey legs in the refrigerator overnight to give the skin a less chewy texture. This last step is optional but plan for 1 to 2 days of prep work before the actual cook.
Man That’s Cooking
Ingredients
- 4 turkey legs
Brine
- 1 gallon water
- ½ cup kosher salt
- ½ cup brown sugar
- 1 tbsp dried thyme
- 1 tbsp dried sage
- 1 tbsp dried rosemary
- 1 tsp allspice
- 1 tsp paprika
- 1 tsp nutmeg
- 1 tbsp black peppercorns
Directions
Boil 1 gallon of water along with all of the listed brine ingredients. Allow the brine to boil for a few minutes then turn off the heat. Remove the pot from the burner and allow the liquid to cool for 1 hour. You can add ice in a large zip seal bag to speed up the cooling process but do not add ice directly to the brine because this will dilute the solution. When the liquid reaches a medium warm temperature, add it to an 8 quart container and place it in the refrigerator for several hours.
When the brine reaches refrigerator temperature (around 32F) then add the turkey legs to the brine. Place the brine back in the refrigerator overnight or at least 12 hours.
After the brine phase, wash off the turkey legs then place them on a sheet pan with a cooling rack. Pat the turkey down with paper towels to absorb as much liquid as possible. It is important to dry off the skin as much as possible to prevent rubbery skin texture. If you have time, place the turkey legs back in the refrigerator overnight and this will circulate air around them which dries off the skin.
When you are ready to cook, preheat your smoker to 230 using apple wood pellets. Spray the turkey legs with duck fat to act as a binder and skin browner. Apply smoked paprika, onion powder, black pepper, and kosher salt on all sides.
Place the turkey legs on an upper rack in your smoker and let them cook for an hour. After an hour, flip them over and then spray them down with duck fat. Check the temperatures and move around any legs from hot areas to cool areas if needed. Repeat these steps until you get close to 165 F, then increase the heat to 300F. Higher heat will help tighten up the skin. Continue cooking until the turkey legs reach around 175F. This should take around 3 hours.
Print This Recipe
Watch How To Make This Recipe
