


Pellet Smoked Prime Rib
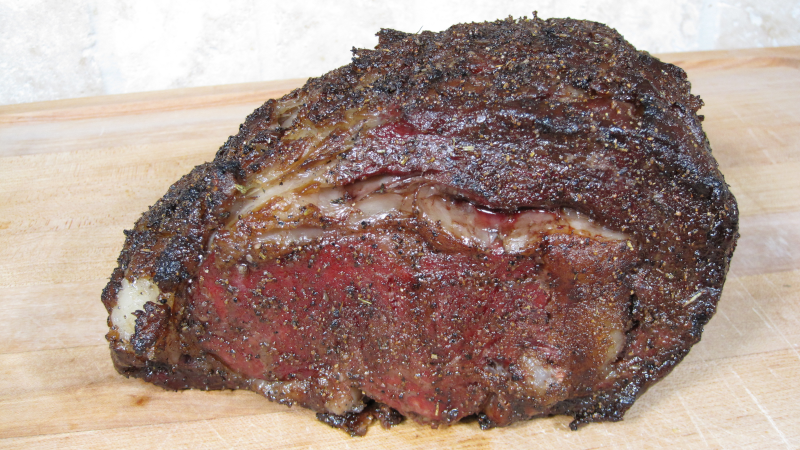
In this recipe, we’re diving into the world of sumptuous flavors and savory indulgence with our Pellet Smoked Standing Rib Roast. This 7-pound marvel, featuring three glorious rib bones, is about to take center stage in a masterful symphony of smoke, fire, and seasoning.
As we fire up the smoker, this rib roast will undergo a transformation that’s nothing short of spectacular. Over the course of four tantalizing hours, it will absorb the smoky essence from the gentle, controlled heat of the pellet smoker, infusing it with a depth of flavor that’s simply unmatched.
But the magic doesn’t end there. A bold and aromatic rub, crafted from a blend of salt, pepper, dry rosemary, thyme, garlic powder, onion powder, mustard powder, and paprika, will enrobe this beautiful cut of meat. This ensemble of seasonings will work in perfect harmony, setting the stage for a taste experience that’s rich, fragrant, and utterly delicious.
After its slow dance with the smoker, we’ll crank up the experience even further. The reverse sear over the fiery heat of the BBQ grill will put the final touches on this culinary masterpiece. The intense heat will create a beautiful crust, encapsulating all the juicy tenderness within, and imparting a delightful char that’s the epitome of flavor.
The Pellet Smoked Standing Rib Roast isn’t just a dish; it’s an experience. Whether you’re planning a festive gathering, a holiday feast, or simply seeking to create a culinary delight that will leave a lasting impression, this roast is your ticket to an unforgettable dining experience.
Man That’s Cooking
Ingredients
- 6 – 7 pound standing rib roast
- 3 tbsp kosher salt
- 2 tbsp black pepper
- 1 tbsp garlic powder
- 1/2 tsp onion powder
- 1/2 tsp paprika
- 1/2 tsp mustard powder
- 1/2 tsp sage powder
- 1/2 tsp thyme
- 1/2 tsp rosemary
- 1/4 cup worcestershire sauce
Directions
First, use a chef’s knife and remove the rib bones by cutting along the bones to separate them from the roast. Keep the bone plate in one piece so they can be tied back in place after applying rub on all sides of the roast and rib plate.
Next, carefully and lightly shave off any hard fat from the fat cap and remove any surface silver skin. This is an optional step as most roasts will be cleaned up by the butcher. But if you do trim, leave at least 1/4 inch of fat cap on the top of the roast. Next, carefully slice a cross hatch pattern in the fat cap by only slicing the fat and not the meat.
Next generously apply kosher salt on all sides of the roast. Place the roast on a cooling rack on a cookie sheet to allow for airflow underneath the roast. Place this in the refrigerator for at least 24 hours and up to 4 days. This will dry brine the roast adding flavor to the meat while also tenderizing it.
After 24 hours of dry brine, remove the rib roast from the refrigerator and keep it on the cooling rack. Prepare the dry rub by combining all the spices and seasonings listed. Apply a thin layer of Worcestershire sauce on all sides of the roast and the detached rib plate. Generously apply the dry rub on all sides of the roast and rib plate.
Place the roast back on top of the rib bone plate. Using butcher twine, tie the rib plate back in place with a loop between each rib bone. The rib plate will act as a heat shield while the roast is on the smoker. This will help roast cook more evenly and they can be quickly detached for the reverse sear step.
Preheat your smoker to 220 F using lighter blended pellets such as competition blend. When the smoker reaches temp, place the rib roast bone side down in the center of the smoker, on the bottom rack. Insert a temperature probe directly into the center of the roast. Set the temperature alarm to 125 F. Smoke for roughly 4 hours until the temp alarm triggers or the roast center reaches 125 F.
Remove the roast from the smoker and loosely cover it with aluminim foil. Allow it to rest for 30 minutes so that the juices settle in the roast and it’s temperature lowers. While the roast is resting, preheat your grill with the burners on high or for charcoal, light one starter chimney of charcoal or lump.
Cut the twine and remove the rib plate from the roast. Sear it for 3 – 5 minutes per side on all sides. Do not close the grill lid and do not walk away. Judge the sear doneness by color and if you need to sear one or more sides longer do so to your desired doneness. Place the rib plate on the grill and cook it 3 – 5 minutes per side. After searing, let the roast rest 5 – 10 minutes then slice and serve. Slice between the rib bones to separate them and enjoy them along with delicious slices of prime rib.
 Print This Recipe
Watch How To Make This Recipe
Rosemary Romano Mashed Potatoes
Rosemary Romano Mashed Potatoes
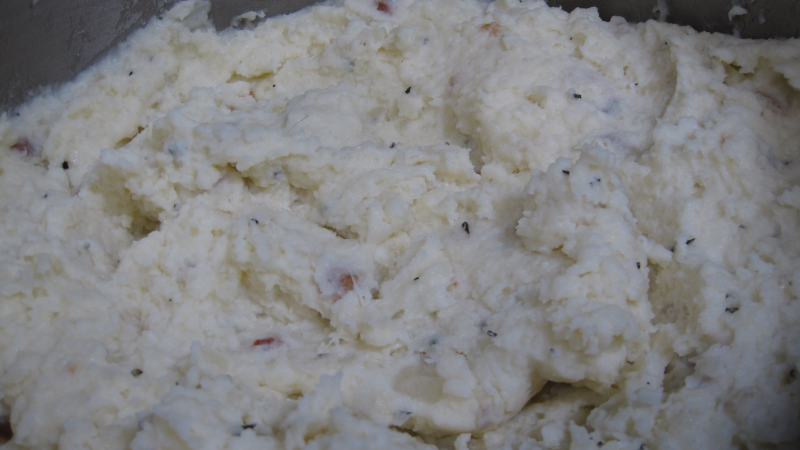
Today, we’re delving into the world of comfort food with our Rosemary Romano Mashed Potatoes. This recipe takes the humble potato and transforms it into a luxurious side dish that’s rich, creamy, and infused with the aromatic magic of fresh rosemary.
At the heart of these mashed potatoes are the russet potatoes themselves, a starchy wonder that becomes the perfect canvas for our culinary creativity. But what truly sets this recipe apart is the combination of savory Pecorino Romano cheese, which adds a salty and nutty depth, and crispy diced pancetta that provides a delightful contrast of textures and a burst of flavor.
To achieve that luxurious creaminess, we’ll enlist the help of two dairy champions: unsalted butter and heavy whipping cream. They’ll melt together into a silky indulgence that will make your taste buds sing. And for that extra touch of tang and richness, we’ll introduce sour cream, creating a harmonious balance of flavors.
The star of the flavor show, however, is the fragrant and earthy fresh rosemary. As it dances through the potatoes, it will infuse them with a tantalizing aroma and a hint of piney sweetness, creating a symphony of flavors that will leave you craving more.
Whether you’re planning a holiday feast, a Sunday dinner, or simply want to turn an ordinary weeknight into something extraordinary, these Rosemary Romano Mashed Potatoes are your ticket to culinary bliss. Get ready to impress your family and friends with a side dish that’s not just food; it’s a warm, comforting embrace on a plate.
Man That’s Cooking
Ingredients
- 4 pounds russet potatoes
- 8 oz pecorino romano cheese
- 4 oz diced pancetta
- 1 stick unsalted butter
- 1 cup heavy whipping cream
- 1 cup sour cream
- 3-4 sprigs fresh rosemary
Directions
First, peel the potato skins then cut them into 2 inch cubes. Make sure all cubes are roughly the same size so that they cook evenly. Place the potatoes in a large pot, then add 1 tablespoon of salt, and submerge them with cold water. Next, bring everything to a boil over high heat and then reduce the heat to medium low, maintaining a simmer. Cook the potatoes for 15 to 25 minutes until they are tender and break apart when stuck with a knife or fork. Drain the potatoes in a colander and let them sit for 5 minutes. Return them to the pot on a low heat for a few minutes to evaporate off excess moisture.
While the potatoes are cooking, finely mince the rosemary and hand shred the cheese.
In a skillet on medium heat, cook the pancetta for roughly 10 minutes until they turn brown. Remove them from the pan and place them on paper towels to absorb the grease. Safely drain the grease from the pan into a jar. Next, melt the butter in the pan over medium heat. Reduce the heat to medium low, then slowly add in the heavy whipping cream and sour cream. Add the rosemary then a minute later remove the skillet from the heat.
Use a potato masher to break down the potato chunks or use a potato ricer and finely mash them into the pot. Slowly fold the butter cream mixture into the potatoes and mix everything together. Finally add in the grated Romano cheese and mash or mix for another minute. If the potatoes seem dry, add 1/4 – 1/2 cup of whipping cream and 1/4 – 1/2 cup of sour cream to moisten up the mashed potatoes.
Print This Recipe
Watch How To Make This Recipe
Dutch Oven Boneless Turkey Roast
Dutch Oven Boneless Turkey Roast
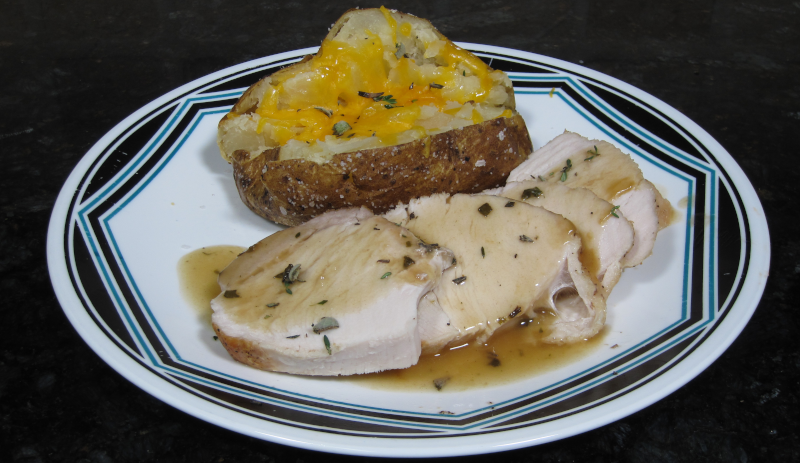
In the world of hearty, home-cooked meals, few dishes rival the comforting embrace of a perfectly roasted turkey. Today, we’re unveiling a culinary gem – our Dutch Oven Boneless Turkey Roast. It’s a dish that combines simplicity and sophistication to deliver a mouthwatering experience that’s sure to become a cherished part of your family’s table.
At the heart of this recipe is a magnificent 3-pound boneless turkey roast, a canvas ready to absorb the flavors of our aromatic herbs and seasonings. We’ll infuse it with the earthy essence of fresh thyme, the robust aroma of rosemary, and the savory richness of sage. These herbs will not only add depth but create an irresistible fragrance that will fill your kitchen as it cooks to perfection.
To ensure every bite is seasoned to perfection, we’ll generously salt and pepper all sides of the roast. Then, we’ll take our culinary adventure to the stovetop, where a preheated Dutch oven awaits. Searing the turkey roast on all sides in a hot Dutch oven will lock in the juices and set the stage for a beautifully browned exterior.
But the magic doesn’t stop there. After this initial sear, we’ll generously coat our turkey roast with a medley of minced thyme, rosemary, and sage, infusing it with even more flavor. Then, into the preheated oven it goes, where it will gently roast to a succulent 170°F, ensuring a juicy and perfectly cooked centerpiece.
As the aroma fills your kitchen, the anticipation will grow. And when it’s finally time to slice and serve, you’ll discover that the Dutch Oven Boneless Turkey Roast is not just a meal; it’s an experience, a journey of flavor that brings warmth and comfort to your table.
Man That’s Cooking
Ingredients
- 3 pounds boneless turkey roast
- 3 sprigs fresh thyme
- 1 sprig fresh rosemary
- 1 sprig fresh sage
- 1 teaspoon kosher salt
- 1 teaspoon black pepper
- 1 teaspoon vegetable oil
Directions
Preheat the oven to 350 F. Preheat the dutch oven on a burner on medium heat. Remove the turkey roast from the outside packaging but leave the string net on the roast. Wipe down the roast with a paper towel, then rub it down with vegetable oil. Salt and pepper all sides.
When the dutch oven is heated, sear the turkey roast on all sides for about 2 – 3 minutes per side. After searing, coat all sides of the roast with oil, then minced thyme, rosemary and sage. Place the dutch oven without the lid in the preheated oven and cook for 60 – 90 minutes or until the roast reaches 170 F.
Remove the turkey roast and transfer it to a cutting board. Allow the roast to rest for 10 minutes uncovered. While the turkey is resting, prepare the gravy by transferring the juices from the dutch oven into a measuring cup.
Add water until you have 1 3/4 cups of liquid. Pour this liquid back into the Dutch oven along with the gravy packet and bring everything to a boil. When the gravy reaches a boiling point, reduce the heat to a medium low and stir with a wooden spoon or silicone spatula removing the fond from the bottom of the Dutch oven. Cook for about 5 minutes or until the gravy is thickened.
Print This Recipe
Watch How To Make This Recipe
Horseradish Cream Sauce
Horseradish Cream Sauce
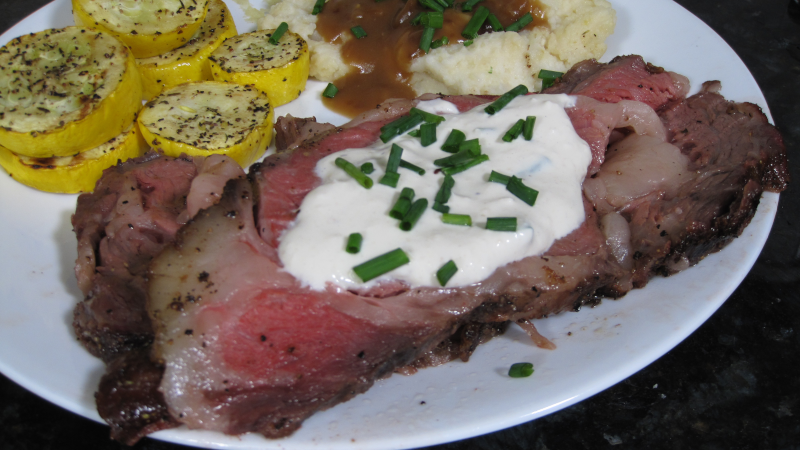
This sauce is a true game-changer, adding a burst of zesty, creamy goodness to your favorite dishes. Whether you’re serving up a perfectly grilled steak, a tender piece of roast beef, or even a juicy burger, this sauce is the secret ingredient that will take your meal from ordinary to extraordinary.
In this culinary adventure, we’ll combine the rich and velvety texture of heavy whipping cream with the delightful tang of sour cream. But that’s just the beginning! Our secret weapon in this sauce is the fiery kick of horseradish, balanced by the bright and zesty notes of freshly squeezed lemon juice. To add depth and complexity, we’ll incorporate the subtle heat of Dijon mustard and the umami richness of Worcestershire sauce.
Of course, every great sauce needs a touch of seasoning, and we won’t disappoint. A pinch of salt and a dash of pepper will enhance all the flavors, creating a perfectly balanced symphony for your taste buds. And for that final flourish, we’ll sprinkle in some minced chives, adding a fresh, herbaceous note that ties everything together.
Man That’s Cooking
Ingredients
- ½ cup heavy whipping cream
- ½ cup sour cream
- ¼ cup prepared horseradish
- 1 tablespoon lemon juice
- 1 tablespoon dijon mustard
- 1 teaspoon Worcestershire sauce
- 1 tablespoon minced chives
- ½ teaspoon salt
- ¼ teaspoon black pepper
Directions
In a medium bowl whisk heavy cream until it thickens up, roughly 2 minutes. Fold in the sour cream and whisk for another minute until it is fully combined with the cream. Mix in the remaining ingredients.
Transfer the cream to a small air tight storage container and refrigerated it for at least 1 hour before using. It should last up to 2 weeks in the refrigerator.
Print This Recipe
Watch How To Make This Recipe
