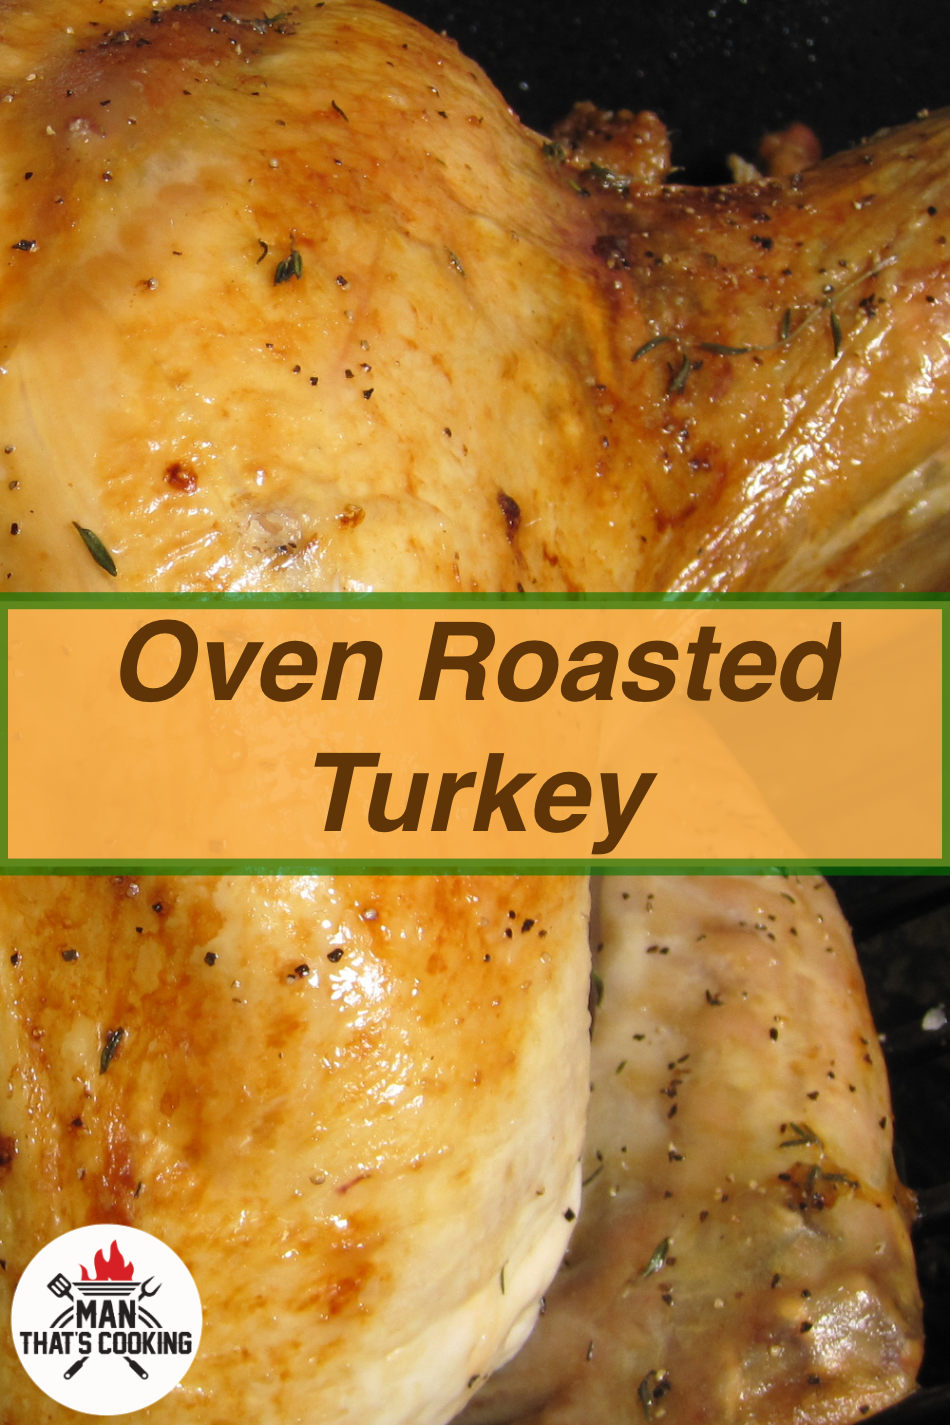
Oven Roasted Turkey

Oven Roasted Turkey

Any time is a great time for turkey and when it comes to the holidays, it’s a big deal. This is nothing to worry about and if you follow this recipe, your turkey will impress all of your guests. This recipe uses a brine which is an optional step but highly recommended. Most store bought turkey is frozen in a solution to make the meat juicy. Because of this pre processing, a brine is not necessary however it will enhance the overall outcome. And if you sourced your turkey from something other than the grocery store (hunting, backyard farm or otherwise) then a brine is an excellent enhancement. If your turkey is frozen, you will need at least 48 hours of thaw time with the turkey in the refrigerator. The brine is easy to prepare and you can do this any number of days ahead and keep it in the refrigerator. The turkey should be brined for 4 to 6 hours max and then washed off and dried with paper towels. Then you should let the turkey dry out in the refrigerator for 24 hours. This will help the skin to become crispy and delicious.

So let’s step through this, assuming this will be a Thanksgiving Thursday turkey and you work 9 – 5 like all of us. Sunday at noon place the turkey in the refrigerator to thaw out. On Monday evening, make the brine and place it in the refrigerator. By Tuesday evening the brine will be cool and the turkey will be thawed and ready to brine for 4 – 6 hours. Tuesday night remove the turkey from the brine, wash off the brine, then dry it with paper towels. Place the turkey on a cooling rack over a foil layer on a cookie sheet. Place the turkey in the refrigerator from Tuesday night to Thursday morning (a little over 24 hours, no biggie). Thursday morning / afternoon season the turkey and roast in the oven. This recipe will cook at 325 F and turkey will require 15 – 17 minutes per pound when cooked at 325 F. So a 12 pound turkey at 16 minutes per pound = 192 minutes total time (12 x 16) which is 3.2 hours (192 minutes / 60 minutes per hour).

Ingredients

  • 10 – 15 pound whole turkey

Print This Recipe Print This Recipe

Brine

  • 1 gallon water
  • 1 cup kosher salt
  • 1 lemon
  • 3 sprigs rosemary
  • 3 sprigs sage
  • 3 sprigs thyme
  • 1 tablespoon peppercorns
  • 1 teaspoon allspice
  • 1 teaspoon paprika
  • 1 teaspoon nutmeg

Directions

If your turkey is frozen, allow it to thaw for 48 hours prior to brine or cooking. For this recipe if you target Thanksgiving Thursday, start the turkey thawing on Sunday.


Prepare the brine several days ahead of the cook. For Thanksgiving, this would be Monday evening. Allow the brine solution to cool down, then place it in the refrigerator to cool it further overnight. The next evening (Tuesday) soak the turkey in the brine for 4 to 6 hours. You can use 1 gallon XL zip seal bags to brine the turkey if you don’t have any containers large enough for the task.


After this, wash the turkey and place it on a cookie sheet and cooling rack setup. Dry it inside and out with paper towels and place in the refrigerator.


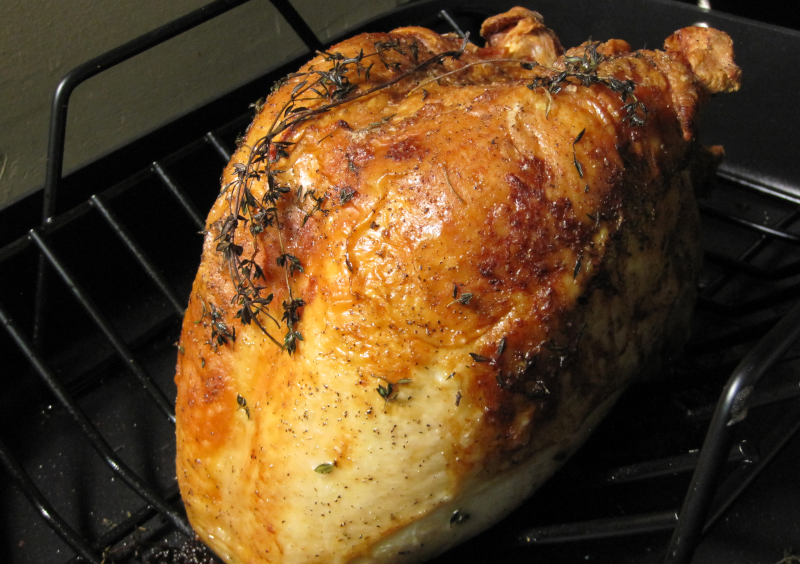
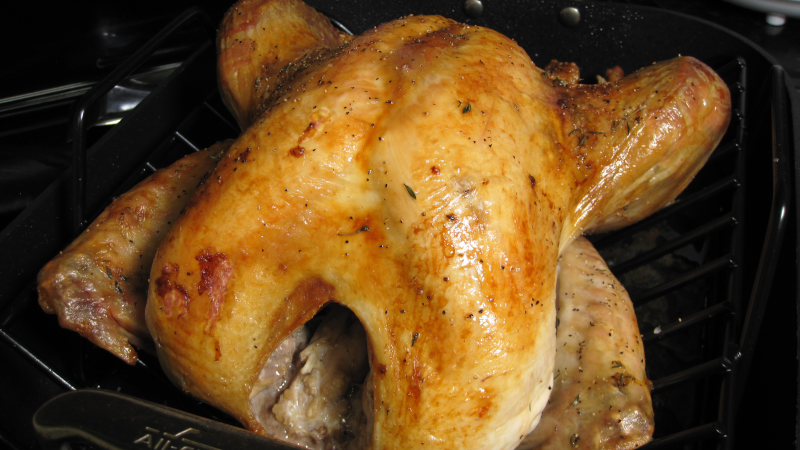
On Thursday, remove the turkey from the refrigerator and brush it down on all sides with melted butter. If you use salted butter, then apply less salt on the surface in the next step. Salt and pepper the turkey on all sides.


Move the turkey to a roasting rack breast side up. Tuck the wing tips under the body of the turkey. Add fresh thyme to the turkey skin. Do not truss the turkey legs unless your grandma makes you do so. This is an old technique that is debated endlessly at this point.


Preheat the oven to 325 F and cook for 1 and a half hours.


Open the oven, slide out the turkey or remove it and brush it down with melted butter. Take the temperature of the turkey and do the math for the remaining cook time. Turkey will require 15 – 17 minutes per pound when cooked at 325 F. The target temp is 165 F in the breast and 175 F in the thigh.


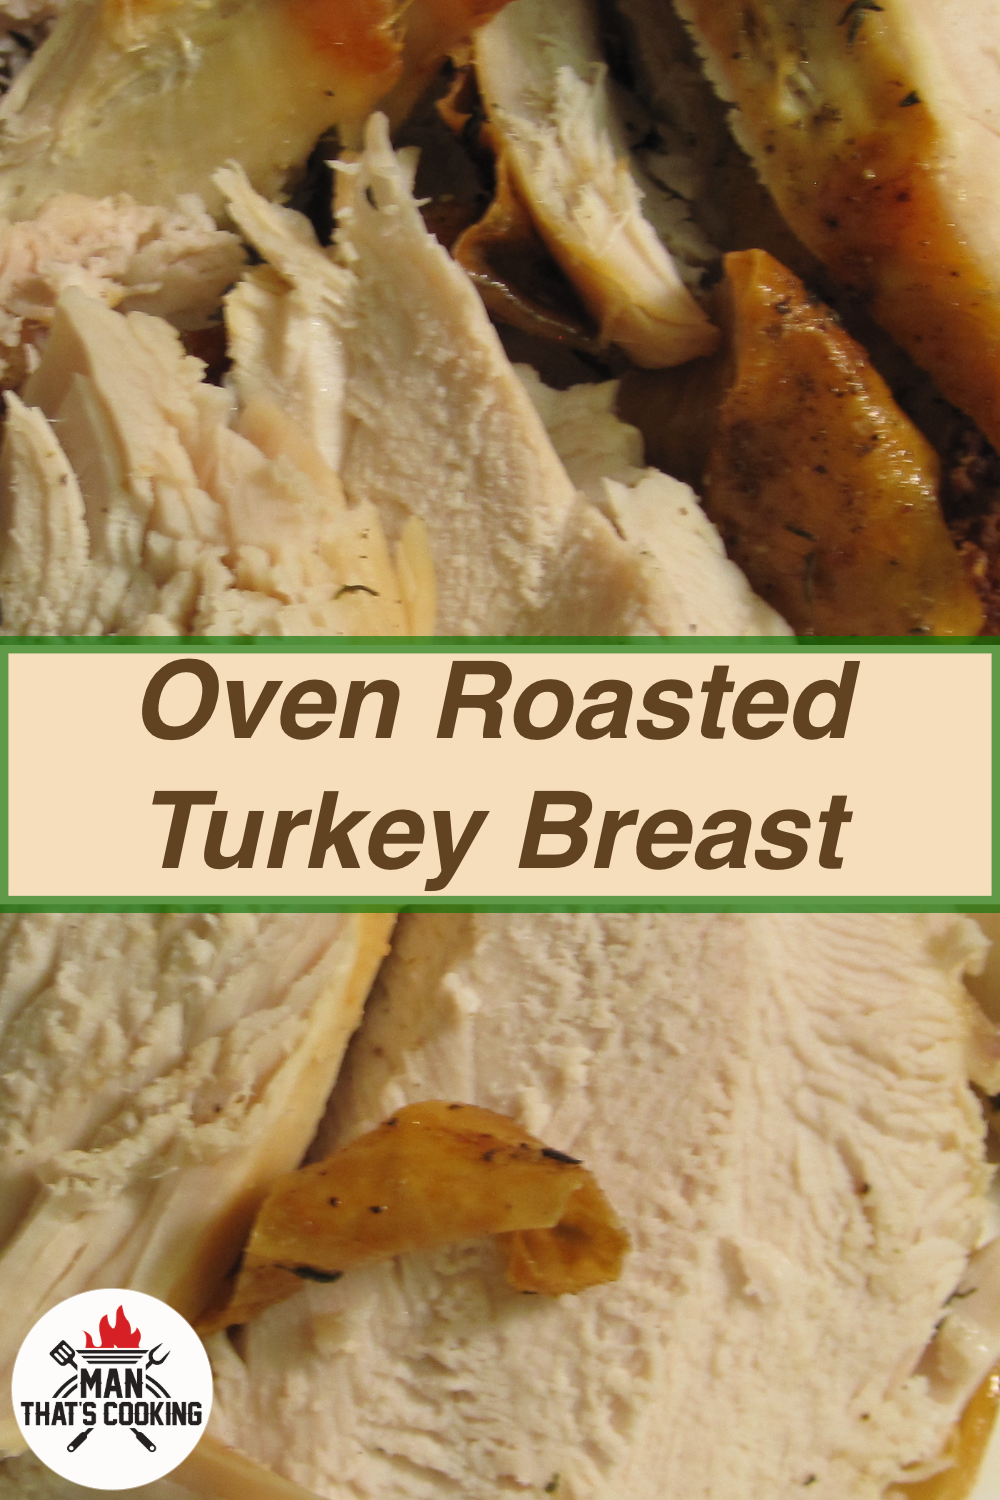
When the turkey breast reaches 165 F in the thickest part of the breast, it is safe to remove it from the oven. Allow the turkey to rest for 30 minutes and do not cover it with foil. If you cover it with foil, condensation will form and will drip back on the skin making it less crispy.

Print This Recipe Print This Recipe

Watch How To Make This Recipe


Holiday Turkey Ballz

Holiday Turkey Ballz

Holidays always need appetizers and this turkey ball recipe does not disappoint! These turkey balls have all the flavors of the holidays except for mashed potatoes and pumpkin pie. You can prepare these ahead of time and cook them later because it’s that easy. For this recipe we used a pellet smoker to add a smokey flavor dimension. If you don’t have a smoker you could easily cook these indirectly on the grill or bake them in the oven.

Ingredients

  • 1 pound ground turkey
  • 6 oz stove top stuffing (turkey flavor)
  • 1 1/2 cups chicken broth
  • 4 oz chevre (goat cheese)
  • 1/4 cup dried cranberries
  • 1/4 teaspoon white pepper
  • 1/4 teaspoon black pepper
  • 1/4 teaspoon dried sage
  • 1/4 teaspoon dried thyme
  • 1/4 teaspoon onion powder

Print This Recipe Print This Recipe

Directions

First, cook the stuffing according to the directions on the box and substitute water with chicken broth. Usually this will require you to boil 1 1/2 cups of broth then add the stuffing mix. Stir around the mixture then cover and remove it from the heat. Let it sit at least 5 to 10 minutes to cool down to room temperature prior to mixing it with the turkey meat.


Mix together the ground turkey and the stuffing. Add the seasonings and continue to mix everything together. You may notice that salt was not on the list of seasonings. You can add salt if you like, but keep in mind the stuffing mix and broth are already salty.


Place some meat and stuffing mixture into the palm of your hand. Flatten it down into a thin round patty until it covers the palm of your hand. Scoop about 1 / 2 teaspoon of cheese and place it in the center of the patty. Add several dried cranberries, then fold the patty closed around the cheese and cranberries. Roll the meat around in your hands forming a round ball. Place the turkey ball on a greased cooling rack.


Smoke the turkey balls with apple or pecan wood at 200 F for roughly 1 hour or until they reach 160F. Transfer them to a grill and cook them over a medium flame until they reach 165F. If you don’t have a smoker you can bake them in the oven at 350 F for around 25 to 35 minutes or until they reach 165 F.

Print This Recipe Print This Recipe

Watch How To Make This Recipe


Oven Roasted Turkey Breast

Oven Roasted Turkey Breast

Thanksgiving is coming up soon and it’s time to talk turkey! When a full turkey is too much for your household, try a bone in turkey breast. These are usually around 8 pounds and serve at least 4 people. For this recipe we are going to soak the turkey overnight in a brine. Brining a turkey will help to flavor the turkey and keep it juicy. This is an optional step as many turkeys from the store are already injected with a basting solution to add flavor and juiciness. But if you have the time, give the brine a try. Another important step is to dry out the skin so that it gets nice and crispy. This recipe will go over several techniques for drying out the skin.

Ingredients

  • 7 – 8 pound bone in turkey breast
  • 12 sprigs thyme
  • 2 lemons
  • 2 bay leaves
  • 4 garlic cloves
  • 1 tablespoon black peppercorns
  • 1 cup kosher salt
  • 1 gallon water

Print This Recipe Print This Recipe

Directions

If your turkey breast is frozen, let it thaw in the refrigerator for 2 days.


First create a brine by boiling 1 gallon of water along with kosher salt, peppercorns, thyme, bay leaves, garlic cloves, and sliced lemons. Bring this to a rolling boil for a few minutes then turn off the heat. You can add ice in a large zip seal bag to speed up the cooling process but do not add ice directly to the brine because this will dilute the solution. When the liquid cools down, place the brine solution into the refrigerator for 1 hour. Next, submerge the turkey breast into the brine and refrigerate it for 8 to 18 hours.


After brining, remove the turkey from the brine and wash it off to remove excess salt. Place the turkey on a cooling rack and pat the skin dry with paper towels. If you have a hair dryer, use it to blow dry the turkey skin for about 10 minutes. If you don’t have a hair drier, you can use a small fan to dry the skin for 10 minutes. Now, if you don’t have a fan or a hair dryer, you can salt the skin and place the turkey in the refrigerator for 24 hours. The idea here is to dry the skin to achieve crispy brown deliciousness. Next carefully remove the wishbone with a small knife. This will greatly improve the slicing of the breast meat.


Preheat the oven to 425 F. Rub down the turkey skin with vegetable oil or melted butter. Sprinkle on some powdered sage, kosher salt, pepper and fresh thyme. Place a few sprigs of thyme on the turkey. Move the turkey to a roasting pan and set it in the rack. When the oven is ready, place the turkey in the oven and cook it for 20 minutes. Cooking at this temperature will help dry out and crisp the skin. Next, lower the heat to 325 F and cook for 75 minutes or until the turkey reaches 165 F at the thickest part of the meat. If the skin is darkening too much before cooking is finished, cover the turkey with foil. For reference, turkey breast should cook 20 minutes per pound at about 350F. But we’ve complicated things by cooking first at 425 F and then at 325 F.


When the turkey is finished, cover it with foil and allow it to rest for 15 minutes. Slice the turkey and serve it with the pan drippings. You can also use the drippings and the dark brown crispy goodness in the pan to make a gravy. But beware, depending on how much salt was used on the turkey, you may end up with a salty gravy.

Print This Recipe Print This Recipe

Watch How To Make This Recipe


Grilled Onion Cheese Dip

Grilled Onion Cheese Dip

Cheese, onions, and bacon… yes! bacon! Everyone needs a few go to cheese dip recipes and this is one of them. This has a very rich addicting cheese flavor that you won’t want to stop eating. And you can cook this dip on the grill if your oven is full with a holiday ham or turkey. You can also just cook this dip in the oven but that’s not as fun as standing outside by the grill with a beer.

Ingredients

  • 8 oz shredded gruyere cheese
  • 8 oz shredded gouda cheese
  • 1 8oz package of cream cheese
  • 1 1/2 cups sour cream
  • 1/2 pound of bacon
  • 2 large vidalia onions
  • 1 tablespoon Worcestershire sauce
  • 1 teaspoon garlic salt
  • 1/4 teaspoon black pepper
  • 1/4 teaspoon cayenne pepper
  • 1/4 teaspoon dried thyme
  • 1 French baguette
  • 1 stick of butter
  • 1 tablespoon herbes des provence

Print This Recipe Print This Recipe

Directions

First, slice 1/2 pound of bacon into bits, then cook the bacon on medium heat for 10 minutes or until done. Remove the bacon from the skillet and place it on paper towels to absorb the grease. Keep the grease in the pan.


While the bacon is cooking, thinly slice 2 vidalia onions. After removing the bacon, add the onions to the pan and cook it in the hot bacon grease for 10 minutes or until browned. Remove the onions and place them on paper towels to absorb the grease.


While cooking the onions, hand shred the gruyere and gouda cheese. Add softened cream cheese and sour cream to a mixing bowl. Add Worcestershire sauce, garlic salt, black pepper, cayenne pepper, and dried thyme. Mix thoroughly with an electric mixer or a large spoon. While mixing, add the shredded cheese, bacon, and the onions. Transfer the mixture to a 13 inch cast iron skillet. If you want to prepare this dip a day before cooking, you can cover the mixing bowl with plastic wrap and store overnight in the refrigerator.


Preheat your grill (or oven) to low (350F) and when it reaches temp, add the skillet directly over the fire. Cook for 20 – 30 minutes, or until brown on the surface.


Slice the French baguette in 1/2 inch thick slices. Place the slices on cooling racks to make things easier for moving the bread in and out of the grill. Melt the butter and brush it on both sides of the bread. Season both sides of the bread with herbes des provence. Place the cooling racks with bread in the grill and cook for 10 minutes.


Remove the cheese dip and bread from the grill, then allow the dip to cool for 10 minutes before serving.

Print This Recipe Print This Recipe

Watch How To Make This Recipe