


Easy Pellet Smoker 221 Baby Back Ribs
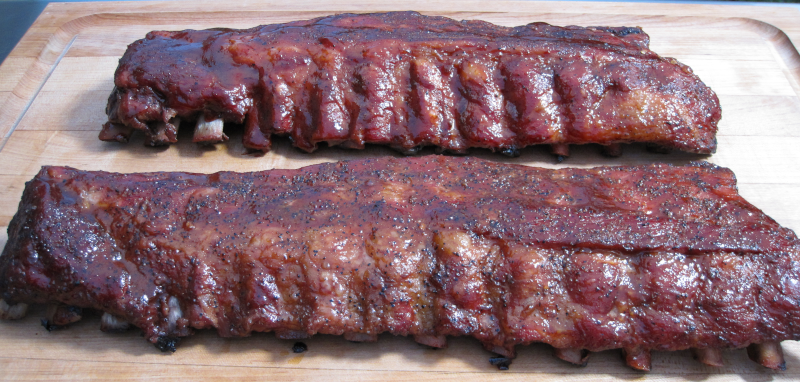
Welcome to the world of smoky indulgence! Prepare to embark on a culinary journey that will delight your senses and leave you craving for more. Get ready to sink your teeth into succulent and tender smoked baby back ribs, a true barbecue masterpiece. These ribs are a testament to the art of slow cooking, infused with smoky flavors that penetrate the meat, creating a symphony of taste and texture. Whether you’re a seasoned pitmaster or a novice backyard griller, the allure of smoked baby back ribs is simply irresistible. So, let’s dive in and discover the mouthwatering magic that awaits with each bite. Get ready to savor the essence of smokiness, paired with the juiciness of perfectly cooked meat, as we unravel the secrets behind this beloved barbecue classic.
Man That’s Cooking
Ingredients
- 2 racks pork loin ribs
- 3 tbsp yellow mustard
- 4 tbsp BBQ rub
- 1/2 cup BBQ sauce
- 1/2 stick butter
- 1/4 cup brown sugar
- 1 tbsp honey
- 1 tbsp tiger sauce
Directions
First, get your smoker started at 235 F with cherry and hickory wood pellets. If you have a smoke tube, get that lighted as well with cherry and hickory pellets.
To prep the ribs, first lay them meat side down and use a boning knife to trim off any extra fat. If there are any fractional bones at the ends, trim them off as well. Next use a butter knife to work it under the membrane and then use a paper towel to grip it and pull off the membrane.
Spread some yellow mustard everywhere to act as a binder for keeping the BBQ rub on the ribs. You won’t taste the mustard so don’t worry about that. Next put down a first layer of a salt pepper garlic based rub such as Killer Hogs AP rub. Next add a rub that has paprika and brown sugar such as Meat Church Holy Voodoo.
Flip the ribs over and check the meat side for excessive fat to trim off. Next repeat the mustard and rub application steps on the meat side.
When the smoker reaches temperature place the ribs in the smoker and push the ends towards each other to compact the ribs as much as possible. Smoke the ribs for one hour, then spritz them with apple juice, cider or apple cider vinegar to keep them moist. You can add other flavors to your spritz but you probably won’t taste it. Continue to cook for one more hour and on this third hour, it’s time to wrap the ribs.
Pull 2 sheets of heavy duty aluminum foil. Place slices of butter on the center of the foil. Add some honey, brown sugar, and splash on some Tiger Sauce. Place the ribs meat side down onto this mixture. Add some butter, dry rub, and Tiger Sauce to the bone side of the ribs. Wrap them tightly in the first sheet of foil, then wrap them again in the second sheet. Place the ribs meat side down in the smoker and continue to cook them for two more hours.
After two hours, pull the ribs and unwrap them. Place them back on the smoker meat side up. Glaze them down with your favorite BBQ sauce and let them cook for 1 more hour until they reach 195 F. You may need to increase the smoker temp a little bit to 250 F to get this done within an hour. When you pull the ribs, let them rest for 5 minutes before slicing.
 Print This Recipe
Watch How To Make This Recipe
Tuscan White Bean Salad
Tuscan White Bean Salad
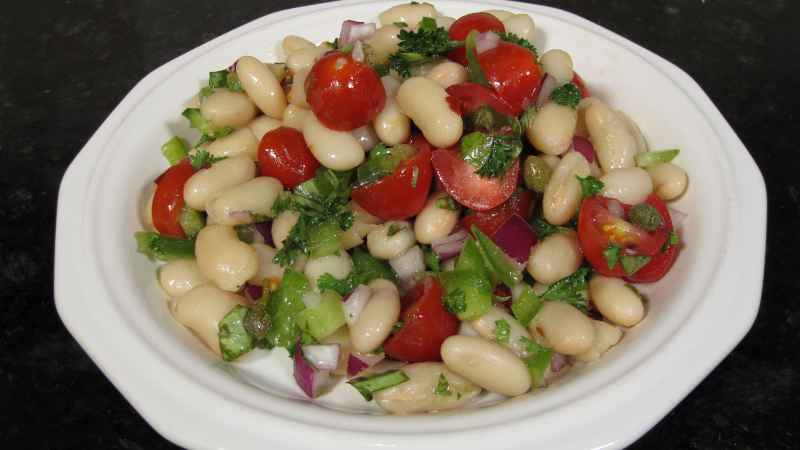
Are you looking for a light, healthy, and easy-to-make salad recipe that will satisfy your taste buds and provide you with essential nutrients? Look no further than Tuscan White Bean Salad! This versatile dish is perfect for any occasion, whether you’re having a backyard BBQ, a potluck dinner, or a simple weekday lunch.
Before we dive into the recipe, let’s take a moment to appreciate the nutritional benefits of Tuscan White Bean Salad. This dish is packed with plant-based protein, fiber, vitamins, and minerals, making it a healthy and satisfying meal option. Here are some of the key nutrients found in Tuscan White Bean Salad:
Man That’s Cooking
Ingredients
- 2 15oz cans cannellini beans
- 1 pint cherry tomatoes
- ½ red onion
- ½ green pepper
- ¼ cup chopped fresh basil
- ¼ cup capers
- ¼ cup parsley
- ¼ cup olive oil
- ½ lemon juice and zest
- ½ tsp red pepper flakes
Directions
First, pour out the cannellini beans into a colander to drain and wash them. While they dry, slice the cherry tomatoes into 3 slices each. For small tomatoes just cut those in half. Dice the onion and pepper then combine it with the tomatoes in a bowl.
Add the beans to the bowl then add the capers and olive oil. Add the zest of a half lemon, then the juice. Mix everything together then add the red pepper flakes, chopped basil and chopped parsley. Mix once more and refrigerate for 1 -2 hours. Serve and enjoy.
Print This Recipe
Watch How To Make This Recipe
Pellet Smoked Cheesy Broccoli Rice
Pellet Smoked Cheesy Broccoli Rice
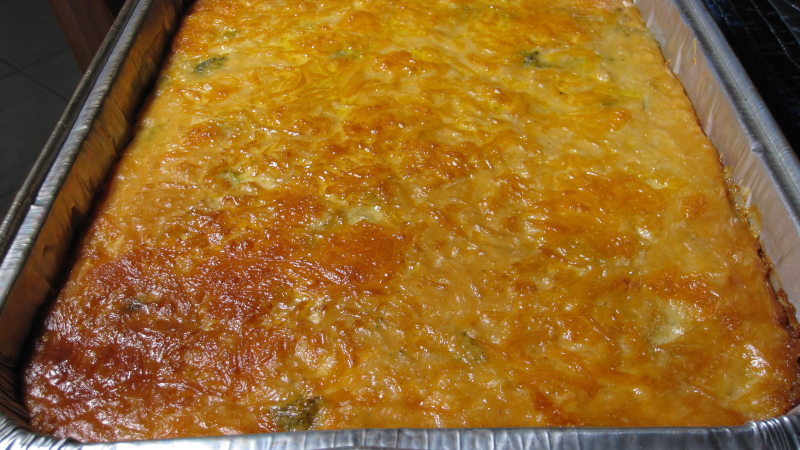
Sometimes a good meal needs a killer side dish. This is one of those crowd feeding side dishes that has your back on the holidays or for any get together cookout. Even if you have a small eating crew, the leftovers will freeze well for another day. Smoked cheesy broccoli rice pairs so well with many other foods that it might become your go to side dish. Kids love the cheese flavor, grandparents missing teeth love it, you just can’t go wrong.
Man That’s Cooking
Ingredients
- 2 heads of whole broccoli
- 1 yellow onion
- 2 cups white rice
- 32 oz chicken broth
- 16 oz cheddar cheese
- 8 oz swiss cheese
- 8 oz mozzarella
- 1 quart milk
- ½ cup all purpose flour
- 1 stick (8 tablespoons) butter
Directions
First, hand shred the cheddar, swiss, and mozzarella cheeses and set this aside in a large bowl. Keep about 1 cup (8oz) of cheddar cheese off to the side for later topping.
Next, remove the large stems from the broccoli florets. Cut the florets into small sizes. Chop parts of the stems into small bits. Par boil the broccoli for no more than 5 minutes then drain in a colander. Run cold water over the broccoli to stop the cooking process.
Finely dice the onion and fry for about 5 minutes until the onion starts to turn translucent.
Bring the 32 oz of chicken broth to a boil, then add the 2 cups of white rice. Reduce the heat to a simmer and cook for 20 – 25 minutes until rice is cooked and tender.
Next prepare the bechamel starting by melting the butter in an 8 qt pot on medium heat and stirring in the flour with a wooden spoon. Cook until it turns light brown, then slowly incorporate the room temperature milk. Next slowly incorporate the cheese and stir with a whisk when the mixture becomes thick.
Finally add the broccoli, onion and rice into the cheese sauce and mix together. Pour the final mixture into a 9×13 foil pan. Top with the shredded cheese that was set aside.
Smoke with pecan or apple pellets at 250F for 3.5 hours.
Print This Recipe
Watch How To Make This Recipe
Hearty Minestrone Soup
Hearty Minestrone Soup
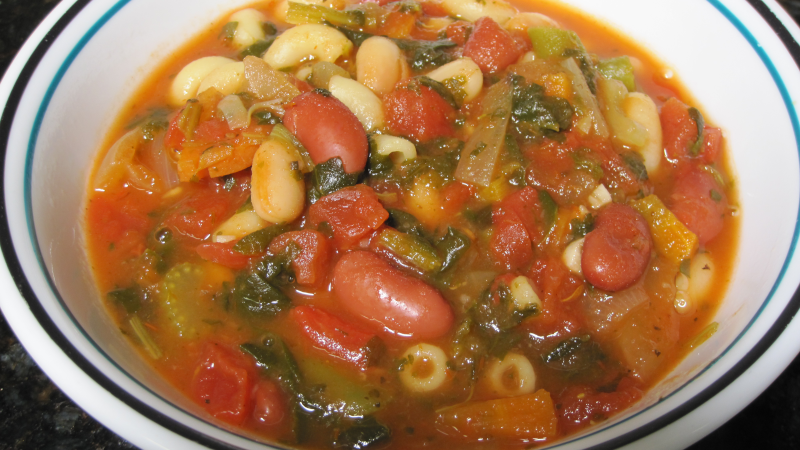
Nothing warms you up on a cold winter day better than a delicious hearty soup. This hearty minestrone soup recipe is loaded with tasty ingredients that take very little effort to put together. All you need to do is chop an onion, some celery, carrots and garlic and the rest just gets dumped into the pot. The soup is made hearty by cooking it with the lid slightly open to let out some steam. This reduces the broth by steaming off the water but keeps in all the good flavor. This soup is meat free but you can add in some cooked Italian sausage for extra heartiness.
Man That’s Cooking
Ingredients
- 32 oz vegetable broth
- 1 white onion
- 3 celery stalks
- 3 carrots
- 2 garlic cloves
- 1 14 oz can crushed tomatoes
- 1 28 oz can of diced tomatoes
- 1 15 oz can cannellini beans
- 1 15 oz can kidney beans
- 1 cup frozen green beans
- 1 1/2 cups frozen chopped spinach
- 1 cup elbow or small shell pasta
- 1 tsp Italian seasoning
- 1/2 tsp kosher salt
Directions
First dice the onions, carrots and celery. Add olive oil to an 8 quart stockpot and heat it on a medium temperature. Saute the onions, celery, and carrots for 8 – 10 minutes. Mince the garlic, then add it to the pot and saute for 1 minute. If you have fresh spinach (not frozen) chop it and add to the stockpot at the same time as the garlic. Add the vegetable broth, crushed tomatoes, and diced tomatoes.
Next, drain and discard the liquid from the canned beans then add them to the stockpot. Add the frozen green beans and frozen spinach. Cover the stockpot with a lid and bring the soup to a boil on medium high heat.
Reduce the heat to almost medium and simmer the soup for 15 minutes with the lid slightly open on the side to let out steam. This is optional and will thicken up the soup but you can close the lid tight during this step.
Next add the pasta and the Italian seasoning then continue cooking for 15 – 20 minutes. Check the tenderness of the pasta at 15 minutes and allow it to cook longer if needed. Turn the heat to low, then salt and pepper to taste.
Print This Recipe
Watch How To Make This Recipe
