Tacos Carne Asada
Get ready to fiesta like there’s no mañana with our mouthwatering Tacos Carne Asada, a celebration of flavor, fire, and fiesta perfect for Cinco de Mayo and beyond! This festive dish pays homage to the vibrant culinary traditions of Mexico, combining succulent grilled flank steak marinated in zesty lime and orange juice with a tantalizing blend of jalapeño, cilantro, and garlic.
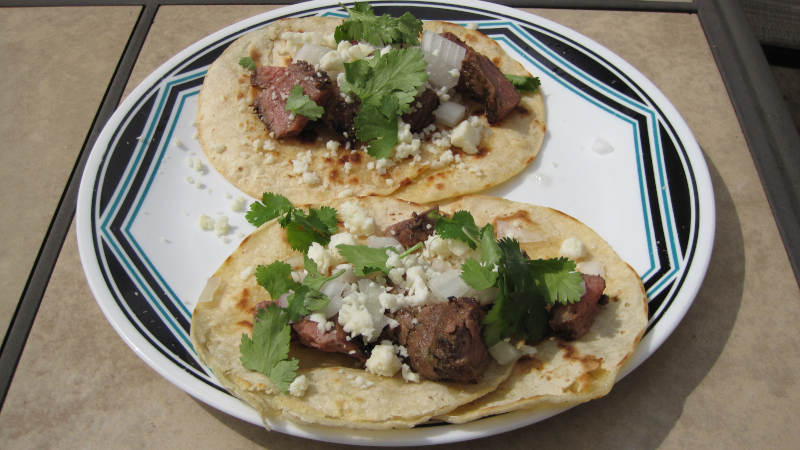
These tacos are a celebration of texture and taste, with each element carefully curated to create a symphony of flavors. Topped with diced white onion for a crisp bite, fresh cilantro for a burst of brightness, and crumbled cotija cheese for a creamy finish, every bite is a party on your palate.
As you gather with friends and family to celebrate Cinco de Mayo, our Tacos Carne Asada are sure to steal the show and ignite your taste buds with the spirit of Mexico. So fire up the grill, grab your favorite cold beverage, and get ready to savor the festive flavors of Cinco de Mayo with our irresistible Tacos Carne Asada.
Marinade
- 1 lime juiced
- 1 orange juiced
- 1 jalapeño pepper
- 4 garlic cloves
- 1/2 cup cilantro
- 1/4 cup olive oil
- 1/2 teaspoon salt
- 1/4 teaspoon black pepper
- 2 tablespoons white vinegar
Tacos
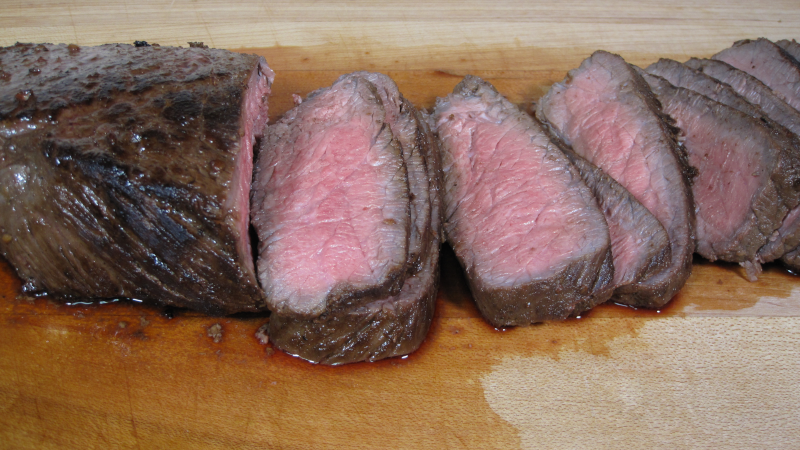
- 2 – 3 lb flank steak
- 10 oz cotija cheese
- 1 white onion
- 1 avocado
- 30 corn tortilla shells
Directions
First, peel and rough cut 4 cloves of garlic and add them to a blender.
Next, squeeze the juice from one orange and one lime into the blender
Next, wash and pick 1 1/2 cups of cilantro leaves. Put 1/2 cup into the blender, then hand chop the remaining 1 cup of cilantro for toppings and place that in a container for the refrigerator.
Next, slice a jalapeño pepper and add it to the blender. Add the salt, pepper, and vinegar. Blend on high for 30 seconds then bring to a low for 1 minute.
Pour the marinade from the blender over the flank steak in a container or a gallon zip seal bag. Coat the steak with marinade on all sides then place it in the refridgerator for at least 12 hours but not over 24 hours.
For taco toppings, peel and dice a white onion and add it to a container for storage. Dice a white cheese such as cojita and store in the refrigerator.
Preheat your gas grill or fire up your charcoal and setup a cool zone for indirect cooking. So for gas grills turn off a burner on one side leaving the other on. For charcoal stack the coal on one side of the grill. Next place the flank steak on the hot zone with the fire and cook for 1 – 2 minutes per side with the lid open. Next move the steak to the cool zone and close the lid. Cook for about 10 minutes then finish the steak over the hot zone. Flip after 1 – 2 minutes to build a nice sear on both sides. Cook until the center reaches 135 F then remove and rest for 5 minutes.
Next, add tortillas on the hot zone for 1 – 2 minutes each side and then remove. While heating up the tortillas, chop the steak into small chunks. When the tortillas are done, assemble the tacos by placing 2 shells partially overlapped. Add the chopped steak, onion, cilantro, queso, and avocado. Squeeze a lime over the taco and enjoy!
 Print This Recipe
Watch How To Make This Recipe