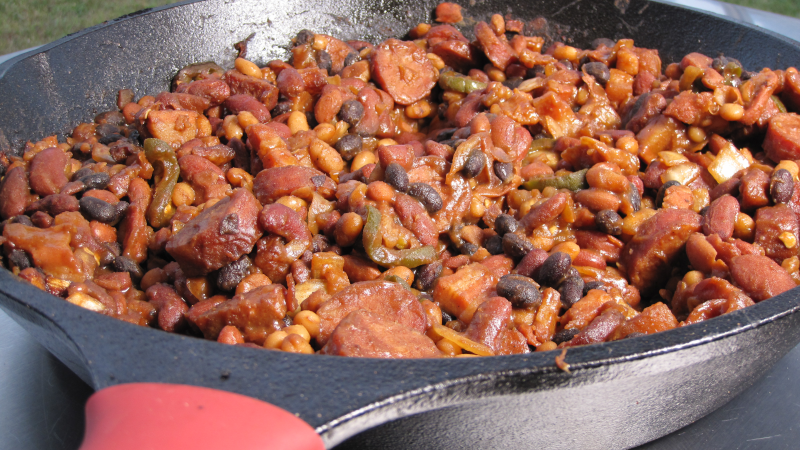
Pellet Smoked Swordfish

Pellet Smoked Swordfish

Swordfish is one of the best fish for cooking over a fire. But did you know it’s pretty tasty when you add some smoke to it as well? A swordfish steak can be smoked low and slow and then finished of with a nice reverse sear. And believe it or not it stays nice and juicy inside and full of flavor.

Ingredients

  • 1 pound swordfish fillet
  • 1 tablespoon olive oil
  • 2 teaspoons killer hogs a.p. rub
  • 2 teaspoons cattleman’s grill tuscan steak seasoning

Print This Recipe Print This Recipe

Directions

The first step is to pre-heat your smoker to 190 F and use a mild wood blend blend such as competition blend.


Next, brush olive oil on one side of the fish. Apply Killer Hogs A.P. rub, then Cattleman’s Grill tuscan steak seasoning. If you don’t have these seasonings, then use any salt pepper garlic steak seasoning that you do have. Flip the fish to the other side and repeat the process.


When the smoker reaches temp, place the fish on a cooling rack then place the rack onto the smoker. Next, insert a temperature probe into the thickest part of the fish and set the alarm at 120 F. This will give you 25 degrees to work with in the reverse sear step.


After about 1 hour and 30 minutes, the fish should reach 120 F and when it does, pull it from the smoker and cover it with aluminum foil. Next prep your grill for reverse searing at a temperature of at least 450 F.


When the grill is ready, spray down the grates with a non stick spray. Place the fish on the grill and cook with the lid open for 5 minutes. After 5 minutes gently pry the fish from the grill grates, then rotate it about 90 degrees. Cook for another 5 minutes, then flip the fish over and repeat these steps. Cook the fish until you reach around 143 F to 145 F. Remove the fish and let it rest a few minutes while the carry over cooking works its magic.

Print This Recipe Print This Recipe

Watch How To Make This Recipe


Apple Butter Smoked Ham

Apple Butter Smoked Ham

The next time you buy a ham from the grocery store, forget about warming it up in the oven! Why not use your smoker to add more smoke flavor? So you may be asking, why do this when most hams are already smoked? Answer: more better smoke! Will it be too much smoke? NO!! And to top things off, add a layer of apple butter and upgrade that grocery store ham into a delicious masterpiece.

Ingredients

  • 8 – 10 pound ham (butt portion)
  • 9.5oz apple butter

Print This Recipe Print This Recipe

Directions

Start your smoker at 250F using cherry or hickory wood. Remove the ham from the packaging and place it face down on a cooling rack. When the smoker reaches temp, place the ham on the smoker for at least 2 hours.


At around 1 and a half hours, add the apple butter to a cast iron sauce pan and then warm it up on the smoker for 30 minutes.


At 2 hours, brush the apple butter onto the ham until it is all applied. Increase the smoker temperature to 275, then cook the ham for 1 hour. At this point, remove the ham and let it rest for 10 minutes. Slice, eat, and enjoy!

Print This Recipe Print This Recipe

Watch How To Make This Recipe


Pellet Smoked Corned Beef and Cabbage

Pellet Smoked Corned Beef and Cabbage

Are you ready to step up your usual St Patricks day meal? Why not try corned beef and cabbage on your pellet smoker? Nothing beats the delicious flavor of smoked brisket and you get even more flavor with a corned beef brisket! Add to that a smoked cabbage stuffed with bacon, onion, and jalapeño and you have a winning meal!

Ingredients

  • 3 pound corned beef brisket
  • 1 large cabbage
  • 1 pound bacon
  • 1 yellow onion
  • 1 jalapeño pepper
  • 2 tablespoons BBQ rub
  • 2 tablespoons coarse black pepper
  • 1/2 tablespoon garlic powder
  • 1/2 tablespoon onion powder
  • 1 teaspoon dried thyme
  • 1 corned beef seasoning packet
  • 4 tablespoons butter

Print This Recipe Print This Recipe

Directions

First, remove the corned beef from the packaging and wash off the red liquid. Save the seasoning packet for later. Place the corned beef in a container and submerge it in water. Place the container in the refrigerator and allow it to soak overnight. This will draw out the salt from the beef. On the next day, remove the corned beef from the water and pat it dry with paper towels. Place the beef on a sheet of cellophane, then apply the garlic powder, onion powder, and black pepper. Grind up the seasoning packet into a powder, then apply it to the corned beef. Finally apply the dried thyme. Flip the beef over and apply the same seasonings in order. Next tightly wrap the beef in the cellophane and place it back in the refrigerator for 1 more night.


On the third day, get your pellet smoker started at 275 F with cherry wood pellets. Remove the corned beef from the refrigerator and unwrap it from the cellophane. If you like, you can dust on more of the seasoning. When the smoker reaches temp, place the beef on the smoker fat side up. You should expect a 4 – 6 hour cook time and the beef should reach a finishing temp of 185 F. When the beef reaches around 150 F – 160 F you should wrap it in butcher paper or aluminum foil. This will help to make the beef tender. When the beef reaches 185 F, place it in a cooler and close the lid. Let it rest for 1 hour before unwrapping and slicing.


To prepare the cabbage, first remove the tough leaves on the outer layer. Next cut the core out of the center of the cabbage using a chefs knife. You want to get a nice sized cavity carved out, roughly the size of a can of soup. Next, place the cabbage in a foil pan, then roll up a sheet of foil to create a ring to hold the cabbage in place. Apply BBQ rub or salt and pepper to the cavity. Next add 1 tablespoon of butter to the cavity. Slice the bacon into bits then fry the bacon in a pan. Remove the bacon when it starts to foam. Remove most of the bacon grease leaving behind about 1/4 inch. Next dice the onion and jalapeños and fry them in the bacon grease until the onions begin to turn translucent. Stuff the cabbage cavity with bacon onion and jalapeño. Add the remaining to the foil pan. Add more seasoning and butter to the top of the cabbage stuffing. Place the foil pan in the smoker and cook for 2 hours. Next wrap the cabbage and extra bacon onion and jalapeño mixture in two sheets of aluminum foil. Cook for another hour then remove it from the smoker. Let the cabbage rest for 10 minutes to cool down, then open the foil and shred the cabbage.

Print This Recipe Print This Recipe

Watch How To Make This Recipe


Smoked Grilled Pulled Chicken Sandwiches

Smoked Grilled Pulled Chicken Sandwiches

Pulled chicken sandwiches are a tasty treat that is easy to make and full of flavor. With this recipe we brine our chicken overnight to add moisture and flavor. Then we smoke it low and slow for several hours and finish it on grill for a kiss of fire. And of course you can build your sandwiches any way you like or you can follow our quick and easy sandwich recipe.

Ingredients

  • 2 whole chicken
  • 4 cups apple juice
  • 2 tablespoons kosher salt
  • 1 teaspoon dried sage
  • 1 teaspoon dried thyme
  • 1 teaspoon dried rosemary
  • 4 tablespoons plowboys yardbird
  • 12 burger buns
  • 1 jar sliced dill pickels
  • 1 package sliced baby Swiss

Print This Recipe Print This Recipe

Directions

First thing to do is to cut out the backbone of the chickens and snip the breast plate so that the chicken will lay flat. This will allow for the chicken to cook evenly so that you are not drying out the breast meat while waiting on the thigh meat to reach proper temperature. Next you should brine your chickens overnight so that they stay moist during the smoking process. For this brine we will place each chicken in a gallon zip seal bag, then add 1 tablespoon kosher salt, 1/2 teaspoon dried sage, dried thyme, and dried rosemary. Finally add 2 cups of apple juice to the bags, seal em up and put them in the refrigerator for 24 hours. Every few hours you should flip the chicken bags over to allow each side to soak in the brine.


After your chicken is brined, wash off the brine and herbs then place the chickens on a cooling rack. Next you want to cut the skin down the center so that you can pull the skin back and season the exposed meat. Heavily season the breast, thigh and drum meat. Flip the chickens over and season the back side. Flip the chickens back then pull the skin back in place to cover the meat. The skin will keep the meat from drying out, and because this is pulled chicken, we really don’t need to worry about keeping the skin all pretty for slicing into. So season the skin and these chickens are ready for the smoker.


Get your smoker running between 240 and 260 Fahrenheit using pecan wood. You can also use hickory or mesquite but avoid using apple if you decided to brine with apple juice. That’s just too much of the same and you should try and layer the flavor instead. Place the chickens on the smoker and let them go for several hours until the temperature in the breast reaches 150 F. At this point get your grill fired up and transfer the chicken to the grill. Place the chicken skin side down and close the lid. Cook for at least 10 minutes keeping an eye on the grill for flare ups. Flip the chickens to back side down then cook until you reach 165 F in the breast and 175 F in the thighs. At this point remove the chickens and allow them to rest for 10 minutes.


When the chickens have rested, put on some heat gloves and start to hand shred the chicken. When it comes to heat gloves, we are talking about a liner glove with a nitrate outer glove. These offer the best movement and touch while blocking heat from your skin. Pull the chicken being very careful not to include any bones or cartilage. When you are done, make a second pass looking for bones. It is very easy to overlook bones when pulling chicken meat. And when it comes to skin, this is up to you, but it will add a nice flavor to shred up and include the skin.


Okay sandwich its time! This is a simple sandwich we are making, it’s just a burger bun with a slice of baby Swiss. Then we add the pulled chicken, some dill pickle chips and some BBQ sauce. Of course you can make whatever sandwich you like, but we hope you give this one a try and let us know what you think.

Print This Recipe Print This Recipe

Watch How To Make This Recipe