Smoked Beer Can Chicken
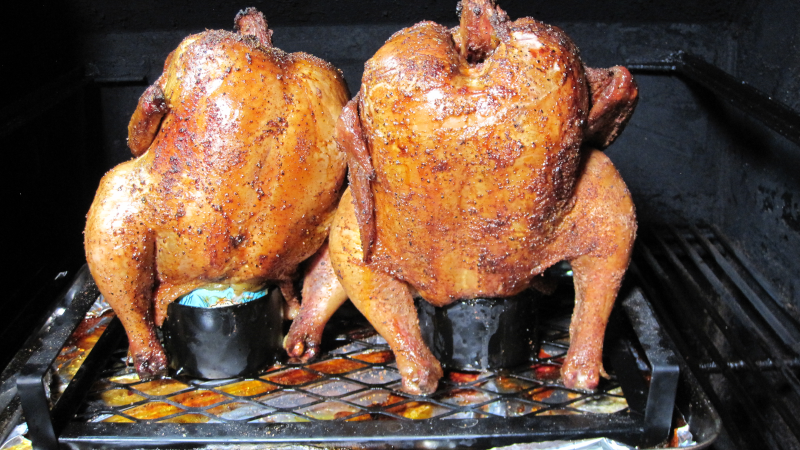
Beer can chicken a.k.a drunken chicken is a fun and easy cook on your smoker or grill. You just need to make sure you have enough clearance to close the lid over a chicken that is going to be standing up. If you want to avoid knocking over the chicken while it’s balanced on a beer can, purchase a cheap beer can holder rack. These come in various sizes so you can get a single or double holder. If you are going to smoke the chicken, you can do low and slow 235F – 250F for around 4 – 5 hours. The skin will be a bit rubbery but you can sear it on high heat at the end of the smoke. For this recipe we’ll run a little hotter at 300F for about 3 1/2 hours. This makes the skin more crispy but gives enough time for some smoke flavor. If you cook this on a grill, it should be done indirectly. For flavoring, this recipe adds herbs and garlic to the beer cans. But you can use citrus or chili peppers or whatever you like.
Man That’s Cooking
Ingredients
- 2 whole chickens
- 2 cans of beer
- 4 garlic cloves
- 6 sprigs thyme
- 6 sprigs rosemary
- 4 sprigs sage
Directions
First, let’s get the most difficult step out of the way. Drink 2 cans of beer. Next use a can opener to remove the tops of the cans. After the tops are removed, add beer until each can is 1/4 full. Next rough cut the garlic cloves into chunks and add them and the herbs to the cans.
Next, remove the chicken from any packaging and dry off the skin with paper towels. Spray the skin on all sides with duck fat and this will help give the chicken a nice golden color. Season all sides of the skin and the inside cavity with your favorite BBQ seasoning. If you don’t have any favorites, a simple salt, pepper, garlic and paprika combo will do.
Preheat your smoker with pecan or hickory wood at 300F. You can use a lower and slower temperature (235F -250F) to get more smoke but the skin will come out less crispy.
When the chicken is seasoned, place the beer cans into the holding rack and slide the chickens over the beer cans. If you do not have a holding rack you can use a foil pan as a base and try to carefully move everything into the smoker. If you are going to use a wireless (or wired) temperature probe, stick it in at the top of the breast near the neck and push it in downward (see video).
Spray the chicken every hour with duck fat to oil those birds up like they are getting a tan at Miami Beach!
When the top of the breast meat reaches 165F and the legs and thighs are 175F, remove the chickens from the smoker and let them sit for 5 minutes. Don’t tent the chickens with foil, it will keep the steam on the skin undoing your crisping efforts. Now you can carve the chickens or pull the meat off the bones for good pulled chicken.
 Print This Recipe
Watch How To Make This Recipe
Smoked Grilled Pichana
Smoked Grilled Pichana
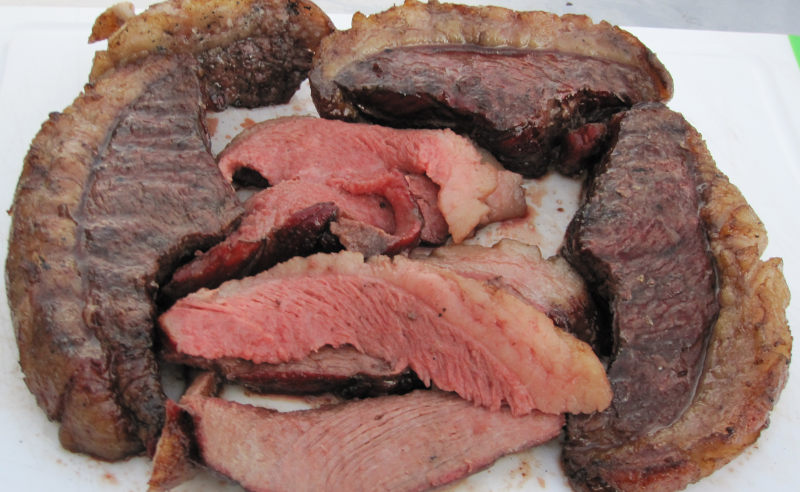
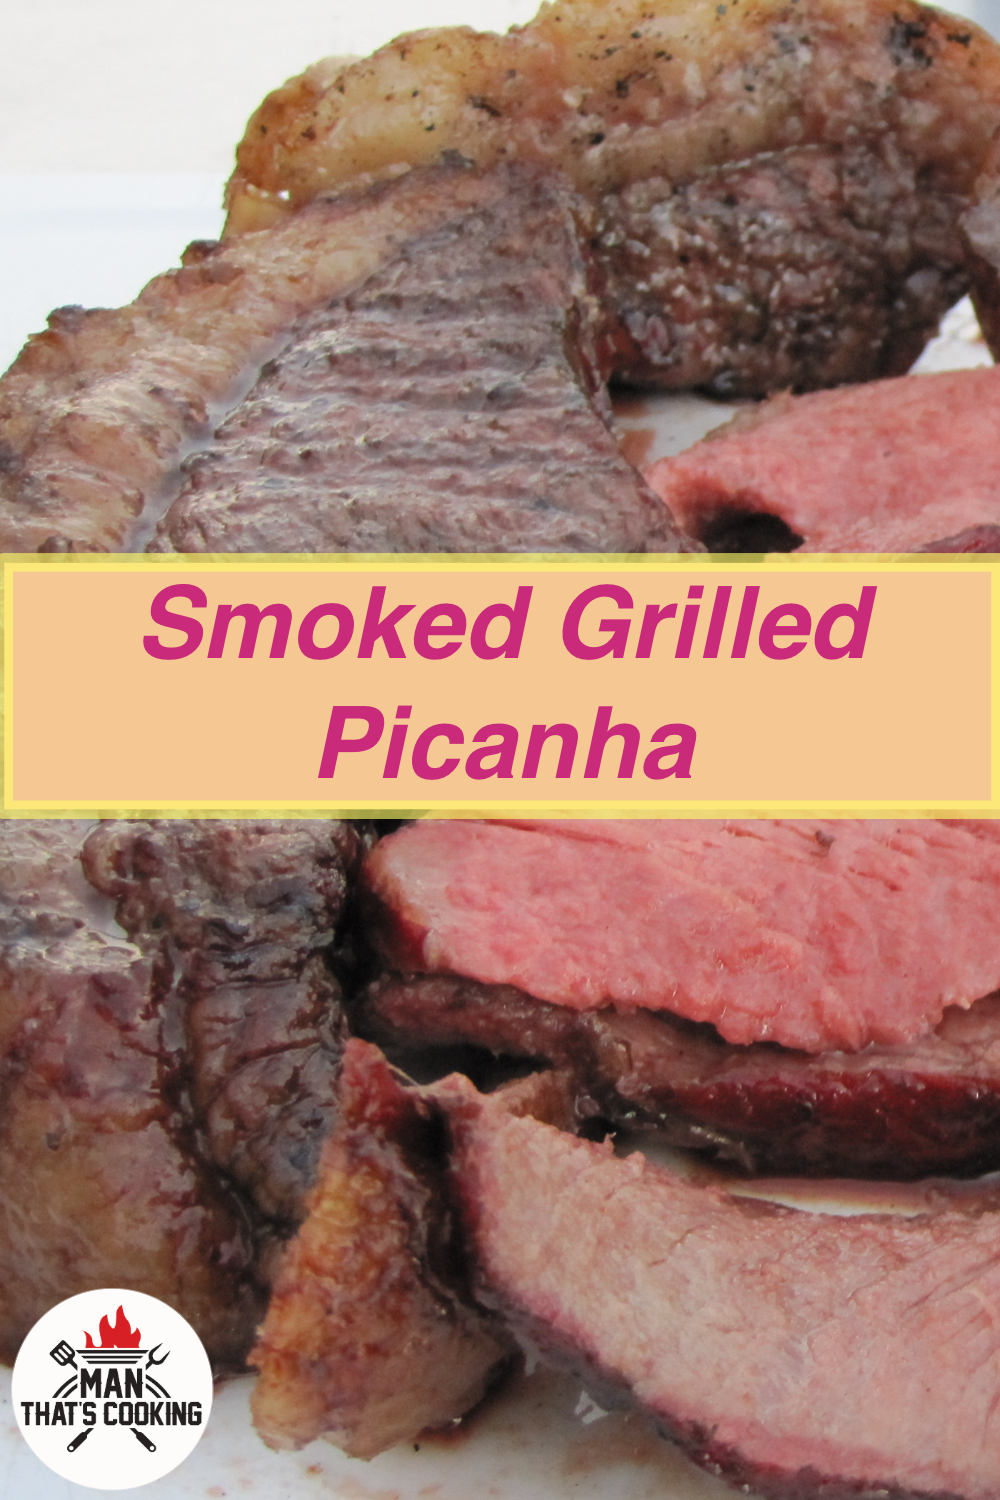
Have you tried grilled picanha aka sirloin cap? This is a cut of beef that is traditionally cooked in Brazil and is one of the top meats there. In the United States, it is sold as sirloin cap and sometimes you will see it labeled as picanha. This recipe takes the cooking method to another level by smoking the meat prior to grilling. Sticking to tradition, the only seasoning used in this recipe is BBQ salt during grilling time. This results in a flavor of delicious beef with earthy smoke fire and salt.
Man That’s Cooking
Ingredients
- 3 – 5 pound Picanha (Sirloin cap)
- 2 tablespoons Kosher Salt
Directions
First score the fat cap with a knife but do not touch the meat underneath. Create a grid which allows the fat to escape and flavor the meat.
Next using the knife, on the meat side, mark the grain of the meat by making a slice in the grain direction. This will be useful when slicing so that slices will be against the grain for more tenderness.
Next place the meat on the smoker fat cap up (debate this in the comment section) with the smoker at 165 F using mesquite wood. Just to clarify, there was no seasoning or marinade used with the meat at this point.
Smoke the meat for 2 hours then pull it and slice it with the grain into 2 finger width chunks. Salt liberally one side of the meat with kosher salt or Brazilian BBQ salt.
Place the meat on a medium temperature grill salt side down (again, debate this in the comment section) for 5 minutes, then flip to the unsalted side. Finally flip to the fat cap side and allow it to burn in the flame. Stay near the grill at all times and do not close the lid during this cook phase.
When the meat reaches 130F pull it from the grill and allow it to rest for 5 minutes before slicing against the grain and enjoying.
Print This Recipe
Watch How To Make This Recipe
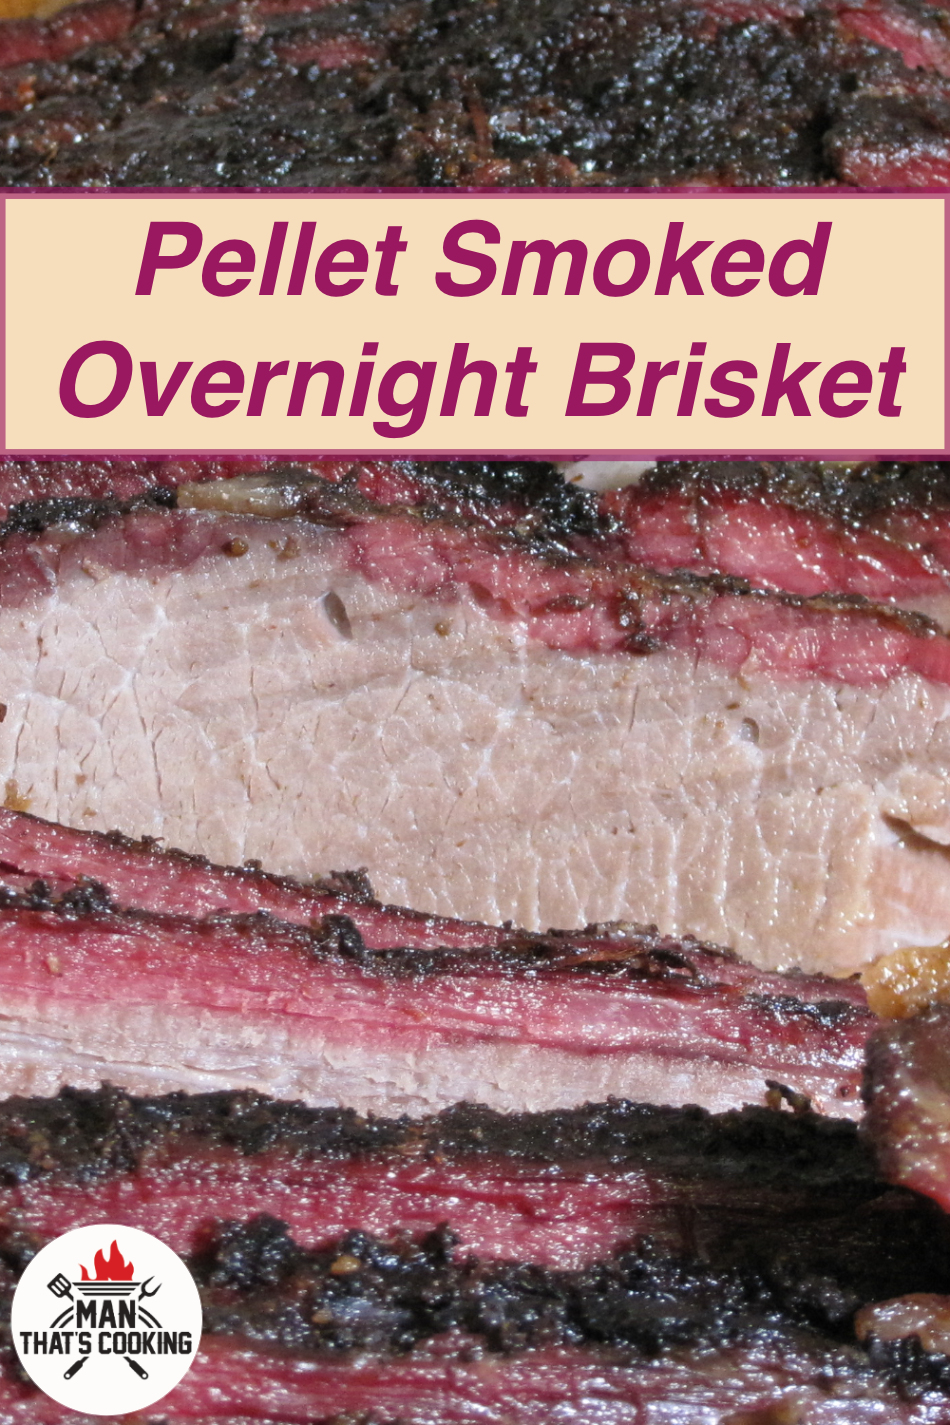
Pellet Smoked Overnight Brisket
Pellet Smoked Overnight Brisket
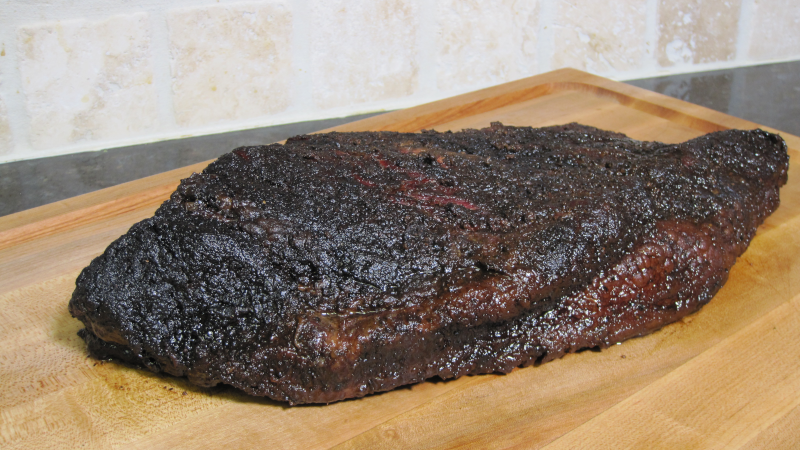
Cooking a brisket overnight on a pellet smoker is one of the most epic cooks that you can achieve on this cooking machine. There is no fire to tend to like an offset smoker would have you do, so you just fill the pellet hopper to the max and sleep till morning. But let’s be real, the sleep won’t be so good especially if you spent some big coin on a prime brisket. You can reduce your sleep anxiety by using a wireless thermometer and setting a 202 F max temp alarm for the brisket and a 180 F low temp alarm with an ambient probe for the smoker. If you are a heavy sleeper you probably should set the brisket max temp alarm at 155 F to wake you when the brisket nears the stall stage. Keep in mind this stall temp could range from 145 – 175 F so you will need to observe the temp around this time. This temp should hit sometime in the early morning so be ready to get out of bed and tend to your cook. Wrapping a brisket will allow it to get past the stall stage and it will make the meat tender by braising it in its juices. You can wrap the brisket with aluminum foil or butcher paper. If you choose aluminum foil, the seasoning bark may wash off somewhat from trapped steam. On the other hand, butcher paper will allow some moisture to escape giving you a thick bark. When the brisket reaches between 202 – 205 F in both the point and flat, take additional readings with a handheld thermometer to confirm this temp. You can also tell when the brisket is ready by feel. When the temp probe slides into the meat like butter with little resistance, then it’s done. When this happens you need to place the brisket in a cooler and let it rest for at least 1 to 2 hours. After this rest period it is ready to unwrap, slice against the grain and enjoy.
Man That’s Cooking
Ingredients
- 12 – 15 pound full packer brisket (choice or prime)
- 1 – 2 tablespoons worcestershire sauce
- 1/4 cup beef brisket seasoning

Directions
First, using a flexible boning knife trim the discolored edges off the brisket on all 4 edges.
Next trim all hard fat from the brisket on all surfaces. Keep the fat cap side in place but reduce any hard buildup fatty areas. You want to avoid scalping the fat into the meat but leave 1/4 inch of a fat layer.
Next rub down one side with a coating of worcestershire sauce and then apply your favorite BBQ rub. Flip the brisket to the other side and repeat. Wrap the brisket in cellophane wrap and refrigerate several hours, ideally 5 hours.
Around 11 pm, remove the brisket from the refrigerator and allow it to warm on the countertop for 15 minutes. Start the smoker at 230 F using hickory pellets and a fully loaded hopper. Ideally this will be a 20 pound bag of pellets. Place the brisket on the top rack if you have one, with the fat cap down and the point facing the hot spot such as the exhaust. Place a temp probe in the point and set the alarm for 155 F and set an ambient probe temp for 180 F low alarm.
When the alarm alerts, monitor the temperature for a few minutes to see if it stays nearly the same. When this happens, wrap the brisket in two overlapping strips of butcher paper. Place the brisket back on the smoker and re-insert the temperature probe(s). Increase the smoker temperature to 250 F. Increase the brisket alarm max temp to 202 F. Check the pellet level in the hopper and add any if needed.
Continue to cook until the temperature probes signal the alarms. At this point, move the probes around to get additional readings and take an average of those readings. Some areas will be higher in temp than others, and you want to go with the mid to lower temp areas as your current temp. When the brisket reaches temp the meat will be very tender and the temp probes will slide in like butter. If that is not happening, you need to continue the cook and re position the temp probe.
When the brisket reaches temperature and the meat is tender, place it in a small cooler and let it rest 1 to 2 hours. If you have a large cooler, wrap the brisket in a towel to keep it insulated.
After the resting period, slice the brisket against the grain, usually starting diagonally from the lower flat corner. Turn the point and slice it against the grain.
Print This Recipe
Watch How To Make This Recipe
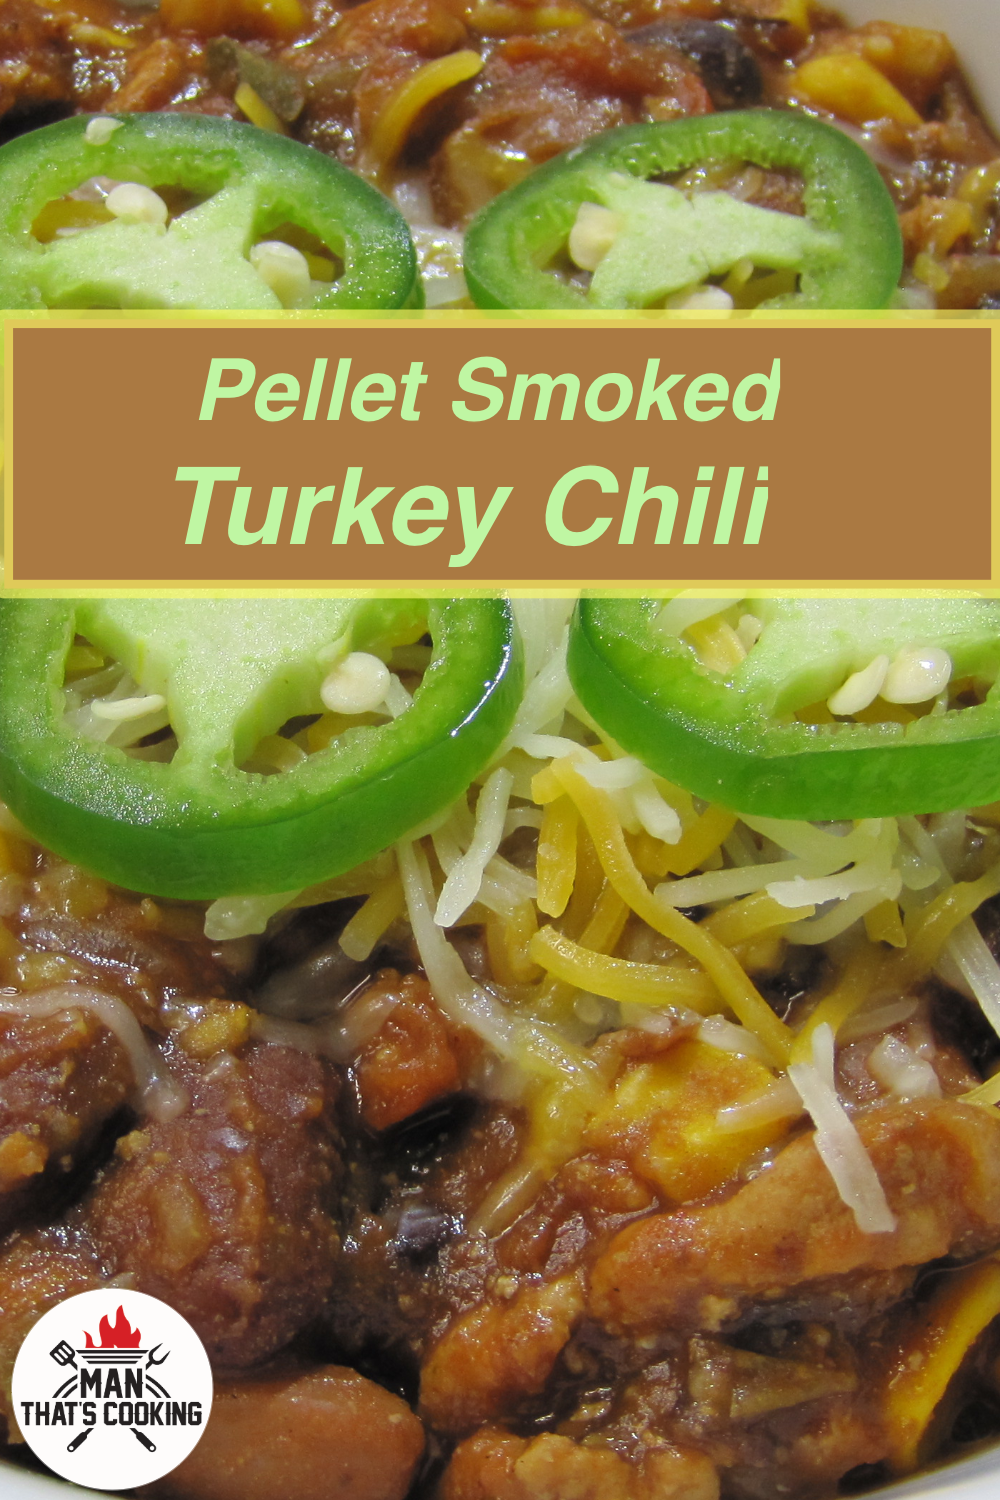
Pellet Smoked Turkey Chili
Pellet Smoked Turkey Chili
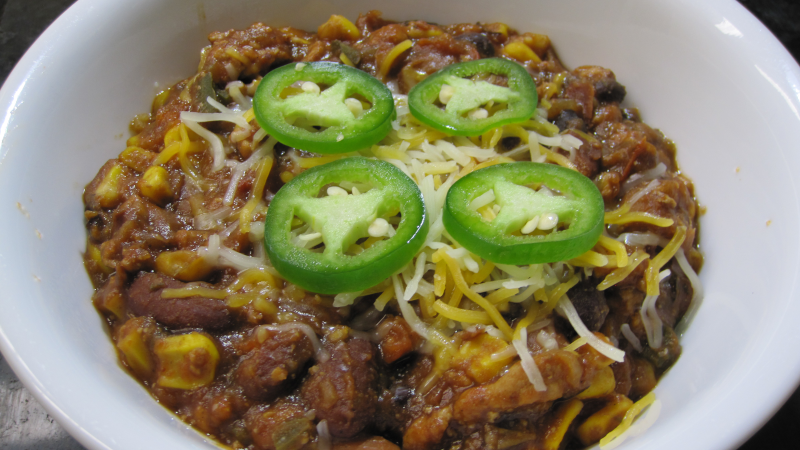
It’s getting cold outside and that means it’s chili time! Turkey chili can be a rewarding meal when you are hungry and need to warm up. This recipe is easy to make except for all the veggie chopping, but that is normal. If you never had ground turkey instead of beef in your chili it’s not bad like you may be thinking. The texture can be slightly different and the flavor is not the same but let’s address that. This recipe calls for 1 can of beef broth and a beef bouillon cube. This adds the beefy flavor that you are used to and makes it quite similar in taste. But hey if you are really into poultry, then you can use chicken broth and bouillon instead. Now let’s talk smoke cause that is where the flavor is at. For this recipe we use apple wood pellets to keep things mild and not too overpowering. You can add some pecan to increase the smoke flavor if that’s what you are into. As with any chili you can go off script and add your favorite ingredients and wood pellets.
Man That’s Cooking
Ingredients
- 1 pound ground turkey
- 1 large white onion
- 4 cloves of garlic
- 4 vine tomatoes (or 2 beefsteak)
- 2 jalapeño peppers
- 1 poblano pepper
- 1 teaspoon chili powder
- 1 teaspoon cumin
- 1 teaspoon chipotle pepper
- 1 packet taco seasoning
- 1 can sweet corn
- 1 can (15 ounce) tomato sauce
- 1 can (15 ounce) kidney beans
- 1 can (15 ounce) black beans
- 1 can (15 ounce) pinto beans
- 1 can beef broth
- 1 beef bullion cube
Directions
First, dice the onion, poblano pepper, tomatoes and one jalapeno pepper. Slice the second jalapeno pepper and set aside. Mince or finely dice the garlic cloves.
In a large skillet, saute the onions in a small amount of butter. Add diced poblano and one diced jalapeno. When the onions begin to turn translucent, add the garlic. Add a splash of beef broth. Cook for 1 minute then add the turkey meat. Mix the turkey meat around, breaking up any clumps into smaller pieces. Add the taco seasoning and continue to cook until the meat is browned and no longer pink.
Add the canned items into a large cast iron skillet or foil casserole pan. Next add the diced tomatoes and the turkey and onion mixture. Add the seasonings then stir everything together.
Place the skillet or pan on the smoker running at 275F with apple wood pellets. Cook for about 4 hours and stir the chili every 30 minutes. Near the end of the cook, if the chili has excess liquid, use an immersion blender to thicken it up.
Print This Recipe
Watch How To Make This Recipe